Sunday, February 23, 2014

Knifty Knitter Spool Loom Projects


Free Patterns and Projects for the Knifty Knitter Spool Loom

Knifty Knitter Spool Loom
The first thing you should know about a spool loom is that it has 2 ends and both may be used for knitting. There is a wide end and a narrow end. Spool looms are generally used for knitting long ropes or cables. For example, the strap of a loom knitted purse is often made with the spool loom. Here are a few patterns to get you started using your Knifty Knitter spool loom, including some ideas you wouldn't expect, such as a Valentine's Day card and a scarf! 


Braided Tube Scarf Pattern

for the Knifty Knitter Spool Loom


Knifty Knitter Spool Loom ScarfThis scarf is made by knitting 5 long tubes on the spool loom and braiding them together along with some fun fur. It adds depth and dimension to the finished scarf. You can experiment by mixing and matching the knitted tubes in different colors. I've seen one done in the primary blue and yellow. It was adorable. This can be a very long project for a beginner, because it takes a while to make all the tubes.

Skill Level: Beginner

You will need:

* Knifty Knitter Pom Pom and Tassel Maker
* Knifty Knitter Spool Loom
* Knifty Knitter hook
* Yarn Needle
* 3 or 4 skeins of worsted weight yarn
* fun fur

Braided Tube Scarf for the Spool Loom
 
 This is the Knifty Knitter spool loom by Provo Craft. If you haven't seen one, you may not realize that they have 2 sides with pegs. One end is slight smaller than the other, so you can make 2 different widths of knit on the same loom. The smaller side can also be used to make the thumb of a mitten or glove.

Knifty Knitter 4-1/2 Inch X 8-1/2 Inch Spool Loom


Spool Loom Valentine

with the Knifty Knitter Spool Loom by Provo Craft

Knifty Knitter Spool Loom Valentine
The cords around the edge of this precious Valentine's day card are knitted on the Knifty Knitter spool loom. The Valentine is a creation of Brenda at the "Loom Lore" blog.

Skill Level: Beginner
You will need:
*spool loom
*several colors worsted weight yarn
*a Knifty Knitter hook
*card stock
*craft glue
Lacy Valentine Scarflet from Loom Lore


More Free Patterns for Specific Looms


Friday, February 21, 2014

Connecting Knifty Knitter Knit


Knifty Knitter Knitting Looms
Two common methods for attaching pieces of knit made on the Knifty Knitter loom are the mattress seam and the hidden seam. Mattress seams produce a neat seam that is barely visible on either side of the knit. The mattress seam works well for projects where both sides of the finished work will be seen, such as blankets. Hidden seams create an obvious seam, but the seam is turned toward the inside, such as the seam of a sweater where the arm meets the bodice.

Connecting Knifty Knitter Panels with the Mattress Seam

The mattress seam is barely visible and is a perfect seam for attaching several Knifty Knitter panels into a blanket.
  1. Place the pieces of knit to be connected on a flat surface. The side most often seen should be facing up. The panels should be laying side by side.
  2. Weave a needle through the center of the stitch on one knit and across to the center of the stitch on the attaching knit. In the center of each stitch, there is a small post, the yarn should be weaved around this post. Weave the yarn back and forth between the two panels. After you have done this approximately 5 times. Pull the yarn tighter to fully connect the panels.
  3. Work attaching the seams of the knifty knitter panels weaving, then tightening the weave, working down the seams.
  4. When the end of the seams are reached, tie a square knot and snip the yarn, weaving the excess yarn into the knit.

Connecting Knifty Knitter Knit with a Hidden Seam

The hidden seam will create a ridge and the bulk of the seam should be on the wrong side of the fabric, similar to a sleeve seam.
  1. When removing each of the knits to be attached from the Knifty Knitter loom, weave a yarn of a different color through the loops to keep them from unraveling. This yarn is temporary and it is not important that it doesn't match. In fact, choosing a contrasting color makes it easier to see and remove the yarn later.
  2. Place the right sides of the knit together and using a crochet hook feed one loop through the loop opposite it on the other knit.
  3. In an alternating pattern feed the loops through each other until the end of the row is reached.

Thursday, February 20, 2014

How to Increase Stitch or Decrease Stitch on a Loom

Knifty Knitter ScarfIncrease stitches add to the width of a finished knitting project by increasing the number of stitches in a row. Decrease stitches reduce with width of the knit by making fewer stitches in the row. In knitting, these techniques of increasing and decreasing stitches are used to change shape, such as adding arms to a sweater. Projects requiring increase and decrease stitches can be done on a Knifty Knitter knitting loom by following a few simple steps.

Increase Stitch on the Knifty Knitter Loom

Increase stitches are used to add width, or flare to any knit project.
  1. Begin the project as close to the center of the loom as possible. This leaves room on both sides of the row to increase width equally.
  2. When the end of the row is reached, rather than turning and knitting off back across the row, use the yarn to wrap an additional peg.
  3. Continue wrapping until the row has been increased by the number of stitches desired.
  4. Continue knitting off back across the row.

Decrease Stitch on the Knifty Knitter Loom

Decrease stitches may be used to taper a waste line of a sweater, or narrow the wrist of a knitted arm.
  1. When arriving at the row that is to be decreased, take the loop on the last peg of the row and unhook it. Place it on the previous peg in the row.Adding it to the previous peg, rather than simply dropping the stitch, prevents the finished knit from unraveling.
  2. Repeat the step above until all the stitches that need decreased in the row have been removed.
  3. When knitting off, knit off all the additional loops that have been placed on the end peg of the row, as one loop.
When creating increase and decrease stitches, the knit will stay symmetrical, or the same on both sides, if the same number of stitches are added or removed from each end. For example, when decreasing a row by 6 stitches, 3 stitches should be taken from each end of the row to keep the work balanced.When working with an odd number that must be increased, or decreased, for a row of knitting stitches, try to alternate the end of the row that gets the most increases or decreases. For example, if you are decreasing 5 stitches from a Knifty Knitter row take 3 from the left and 2 from the right side of the row. In the next row, if more stitches need to be decreased, and the total number of stitches removed is an odd number, take the extra stitch from the right side rather than the left.

Wednesday, February 19, 2014

How to Purl Stitch on a Knifty Knitter Loom

Purl Stitch on the Knifty Knitter
Purl Stitch on the Knifty Knitter|Heather Schulte
The purl stitch is a type of knitting stitch. In regular knitting, the purl is the opposite of a knit stitch. If a panel of fabric is knitted one side will have tightly knit "V's," the other side will have a series of short lines. The side with the "Vs" is referred to as the knit side and the side with the short tight lines is the purl side.A purl stitch can be created on a Knifty Knitter loom, just like it is on a pair of knitting needles. As in regular knitting, this stitch on a Knifty Knitter loom creates a finished knit panel that has the appearance of tightly weaved "Vs" on the knit side and a series of short straight lines on the purl side. The ability to combine the knit and purl stitch creates an unlimited number of knitting possibilities on the Knifty Knitter loom.

Making the Purl Stitch

  • Begin by tying a slip knot and securing the slip knot to the anchor peg on the Knifty Knitter Loom.
  • Ewrap the Knifty Knitter loom one time around.
  • Typically, the first loop on each peg of the Knifty Knitter loom is pushed down before knitting off the loom. This leaves room for the next loop to be placed on the peg. In the purl stitch, however, you will begin by pushing the loop to the top of the peg. The loop should be at center or higher.
  • Pull the working yarn across the front of the first peg to purl stitch. The yarn should be under the loop that is on the peg. From the top, slide the Knifty Knitter hook under the loop on the peg and snag the working yarn with the hook. Pull the working yarn up through the loop on the peg. This made a new loop.
  • Grasp the new loop between your fingers and use this to lift the old loop off the Knifty Knitter peg.
  • With your fingers, replace the old loop on the peg with the new loop you just created.

Using the Purl Stitch

The purl stitch is ideal for creating closely ribbed, tight knit. The purl stitch can be used in making hats, scarves, purses and many other projects.


Tuesday, February 18, 2014

Knifty Knitter Fingerless Glove, Arm and Hand Warmer Patterns


Fingerless Glove and Mitten Patterns for the Knifty Knitter Looms

this lens' photo
Fingerless gloves, mittens, arm warmers and hand warmers are very popular. The fingerless gloves usually have a partial finger, but are open at the end of each finger. The fingerless mittens don't have finger holes, instead they are open at the base of the fingers, but usually have a thumb hole. They are also called hand warmers, arm warmers and texting mitts. The longer variety that covers the forearm are called arm warmers.

The fingerless mittens seen in this photo are for sale at Art Fire.com


Child's FIngerless Gloves Pattern


Knifty Knitter Fingerless GlovesThis fingerless mitten pattern uses the flower loom.

Skill Level: Beginner

You will need:
* Knifty Knitter Flower Loom
* Yarn Needle
* Yarn: 2 skeins of yarn
* Knifty Knitter Hook


Knifty Knitter Fingerless Gloves Pattern


Wrist Warmers

Free Pattern for the Blue Round Knifty Knitter Loom


Knifty Knitter Wrist WarmersRowena, at the Rositchery blog calls these wrist warmers. They are pretty quick to make taking only about an hour.

Skill Level: Beginner

You will need:
* Knifty Knitter Blue Round Loom
* Yarn Needle
* Sport Weight Yarn (Used in Photo)
* Knifty Knitter Hook

Wrist Warmers Pattern


Knitting a Flat Panel with the Knifty Knitter Loom

Knitting a Flat Panel with Knifty Knitter Long or Round Looms

this lens' photo
When I began loom knitting, I assumed that long looms were for flat panels and round looms were for tube, or circular knit. I was wrong. You can knit tubes on long looms. You can also knit flat panels on round looms. This page is about making flat panels on round looms, so I'll show you how it's done below.


Single Knit on a Knifty Knitter Loom

Also known as a flat panel of knit

knitting a flat single knit panel on the knifty knitter long loomWhen knitting a flat panel with the Knifty Knitter loom, you stop and reverse direction at each end of the loom. This is indicated by the red arrows in the photo. Each time you reach the red arrow, you stop and knit back across the loom from the direction in which you just came. The result is a flat panel with a single layer of knit.

Circular Knit on a Knifty Knitter Loom

Also known as tube knit, like a sock

circular knit on the knifty knitter loomI placed a photo of circular knit here, to show you another possible method of knitting on the long looms. To knit a tube, or circular knit, you go continuously around the loom in the same direction, never reversing. You spiral until the knit reaches the desired length.

Knitting a Flat Panel with a Knifty Knitter Round Loom

knitting a flat panel on a round knifty knitter loomBecause the finished knit is determined by the method of knitting, not the shape of the loom, it is possible to knit a flat panel on a round loom. Knit around the loom until you reach the stop point. Then reverse direction and knit back across to the other stop point, instead of spiraling around in the same direction. Do this repeatedly stopping and reverse directions at the stop points. This creates a flat panel knit on the round loom.


Knitting a Double Thickness Flat Panel on the Knifty Knitter Long Loom

knitting a flat panel of double knit on the knifty knitter loomThere is one more method of knitting a flat panel on the Knifty Knitter looms. It can be done only on the long looms. It creates a flat panel of knit with a double thickness, such as a heavy blanket, or a scarf. It is created by wrapping the loom up and down using both top and bottom, then knitting off in a back and forth motion across the loom. The figure 8 stitch, ribbed stitch, and honeycomb stitch are all types of double flat panel knit.


Drop Stitch Shawl Pattern for the Round Yellow Loom


This elegant shawl is perfect for an evening out. Because it's made from very warm Superwash Merino wool, it will keep the chill off your shoulders and it's easy to maintain. This wool is washable.


The dropstitch is a knitting technique for creating open, see-through knit with a lacy appearance. In loom knitting, stitches are deliberately dropped in a repeated pattern to achieve this desired effect. This dropstitch shawl was created by alternating rows of drop and e wrap stitches.

Intermediate skills are required. If you've mastered all the beginning loom knitting stitches, such as the e wrap and purl, the drop stitch is a good next step. It will require approximately 10 hours to complete.

You Will Need:


To make this shawl, you will need the supplies below:
6 skeins of Knit Picks Swish Worsted Merino Wool Yarn (Black)
Extra Large Round Knifty Knitter Loom (Yellow)
Knifty Knitter Hook 


Instructions for the Dropstitch Shawl
  1. Holding 2 strands of yarn together as one, cast on by e wrapping 30 pegs.
  1. E wrap and knit back to peg 1.
  1. Purl peg 1 twice. Purl peg 2 twice.
  1. Double e wrap pegs 3 through 30. ("Double e wrap" means wrap each peg 2 times as you move clockwise around the loom. Each peg will have 3 loops when finished.)
  1. Knit back to peg 3 bringing the bottom loop over the top 2 loops.
  1. Drop stitch pegs 3 through 30 by lifting the top loop off each peg. This releases the double loop into one large open loop, or dropstitch. Push these open loops down on the pegs as you work to prevent them from coming off the loom.
  1. Repeat from step 2, eighty times or until the shawl reaches the length you desire.


The first two pegs of this shawls are knitted by alternating the e wrap and purl stitches. This creates an edge that will not roll.


Add the Fringe

To the Dropstitch Shawl


Fringe is added along the sides and bottom of the shawl.

  1. Holding 3 strands of yarn together as one, cut them into 10 inch pieces.
  2. Still holding 3 yarns together as one, fold them in half. Using a crochet hook, feed the hook under two loops from the side of the shawl. Hook the yarns you are holding together and have folded with the crochet hook and pull them gently through the loops. Pull them approximately one inch with the hook. This creates a loop.
  3. Feed the loose ends of the fringe through the loop created in the previous step. Tug the ends gently to tighten the knot and secure the fringe.
  4. Continue along the sides and bottom of the shawl until all three sides have the amount of fringe desired. (See the photos below.) 

Knifty Knitter Snowman Patterns


Snowman Patterns for the Knifty Knitter Looms

this lens' photo
There are so many adorable snowman patterns available for the Knifty Knitter loom online, I decided to collect them all here. All have photos, so you can see a sample of the finished project. These snowmen are perfect knitted Christmas crafts and gifts.


Photo Credit: Grant MacDonald


Snowman Sweater

Pattern for the Knifty Knitter Looms


snowmans photosculpture
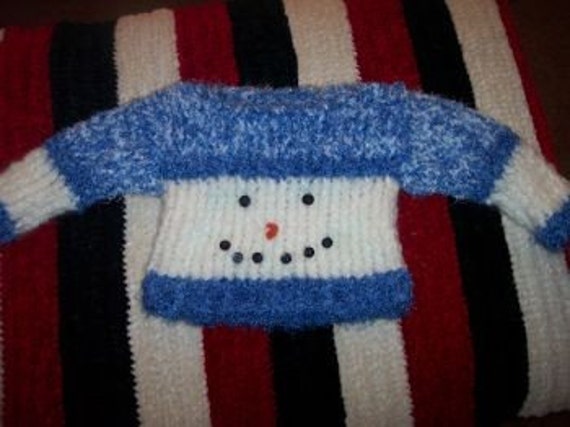
This super cute snowman sweater pattern is available at Etsy.com, but it's free. You'll need the green round loom.

Snowman Sweater


Stuffed Snowmen Pattern

for the Knifty Knitter Flower Loom


snowman knifty knitterThis pattern comes from the Loom Lore blog where she explains how to make these stuffed snowmen with the flower loom. If you have some extra time, she also has some adorable holiday angels on this blog that can be loom knitted also.

Stuffed Snowman Craft


Frosty the Snowman Hat Pattern

for the Knifty Knitter Looms


How cute is this? Make sure that the kids on your Christmas list are decked out in this Frosty hat this winter season.


Frosty the Snowman Hat Pattern


Stanford the Snowman Pattern

by Sweet Things Di Zia Sara's Blog


This pattern is being sold for $4.00. It features the e-wrap stitch.


Stanford Snowman Pattern


More Snowman Patterns

for Your Knifty Knitter Loom


Loomed Snowmen Trio
This stuffed trio of snowmen is from Bev's Country Cottage. The hat and body of the snowmen is knitted using the blue loom, or smallest loom in the round loom set. For the scarves, they recommend using the "wonder knitter" or crocheting them. Another option that I would suggest is following the instructions for an "I-cord" and simply making the cord slightly wider. It would make a perfect snowman scarf and you can use a loom that you already own. The stitch used to make these snowmen is the e-wrap, also called the twisted stockinette.
Loom Lore: Snowman Cozy


I'd use this cozy from the "Loom Lore" blog to cover candles, or gift jars, but it says it's for toilet paper. The possibilities are endless.

It uses the red Knifty Knitter loom, and the spool loom for the scarf. This snowman cover was also done in the "e-wrap," or twisted stockinette stitch. I love the burgundy color of the hat and scarf.

Free Knifty Knitter Mittens Pattern


Pattern for Knifty Knitter Mittens
Pattern for Knifty Knitter Mittens|HS Schulte
The Knifty Knitter blue round loom is used for all sizes of mittens. The blue loom is the smallest in the set of round looms. These mittens are incredibly warm, as they are knitted using two strands of yarn together to create a thick finished knit. The mittens are knitted using the one-over-two stitch, which is an easy stitch for beginners to loom knitting.

Knitting the Thumb for the Mittens

Wrap nine pegs of the loom using the e-wrap and two strands of yarn as one. Continue wrapping back and forth across these nine pegs until each peg has been wrapped three times. One of the most common mistakes a beginner makes when wrapping a loom is to wrap it too tightly. This makes it very difficult to knit off. When e-wrapping the loom, wrap very loosely.
  1. Knit-off by pulling the bottom loop on each peg up over the top of the next two loops on the peg. This method of knitting off is called a "one-over-two stitch," or "double stitch." Continue knitting off using the one-over-two stitch for 18 rows. This means that knitting off is done back and forth across the loom 18 times. At the end of each row, knit-off the end peg only once.
  2. Cut the tail of the yarn one foot long. Thread the tail through a yarn needle and use this needle to stitch up through each of the remaining two loops on each peg. Once all the loops have been removed from the Knifty Knitter loom, pull the yarn tight to gather up the sewn through edge. Tie the yarn to hold the gather, but do not cut it.
  3. Turn the knit so that the wrong side is facing out and stitch the thumb together using the yarn to sew down the length of the thumb.

Knitting the Body of the Mittens

  1. E-wrap 22 pegs of the blue Knifty Knitter loom using two stands of yarn as one. Continue wrapping back and forth across these 22 pegs until each peg has been wrapped twice. Begin to wrap the loom a third time, but this time alternate the direction of the e-wrap on every other peg. The top of the "e" should face the outside of the loom on the first peg wrapped and the inside of the loom on the second peg wrapped.
  2. After all the pegs are wrapped three times, knit off using the one-over-two stitch. Continue this pattern of wrapping and knitting off until four rows have been knitted.
  3. Return to e-wrapping all the pegs with the top of the "e" facing out, as was done with the thumb of the mittens. Use the one-over-two stitch and continue wrapping and knitting off rows until 55 rows have been knitted.

Finishing the Knifty Knitter Mittens

  1. Cut the tail of the yarn 2 feet long. Thread the yarn through a yarn needle. Sew up through each loop on the pegs. After sewing through a loop, remove it from the peg.
  2. Pull the tail tight and tie a knot in the tail with the top of the mitten gathered. With the mitten turned wrong side out, sew along the side of the mitten to stitch it closed. Just before reaching the half way point, place the thumb along the seam being stitched. The right side of the thumb will be inside the glove. Stitch along the sides of the thumb to attach it to the body of the mitten, then complete the seam to complete the side of the mitten. Some trial and error is often necessary to position the thumb in exactly the correct location along the seam.
Repeat the steps above for the second mitten. The right and left mitten are identical. The pattern above will make mittens large enough for an adult. To alter the pattern for a young adult, reduce the number of pegs wrapped in each row by 2 pegs. Reduce the number of rows knitted by 5 rows. To knit a pair of mittens for a young child, reduce the number of pegs wrapped by 4 pegs. Reduce the number of rows knitted by 10 rows.

    Monday, February 3, 2014

    Leg Warmers

    Knifty Knitter Leg Warmers
    This pattern is for leg warmers on the small, pink, long loom. The e wrap is used to knit back and forth to create a flat panel of knit. Change the color of the yarn after every 4 rows. After the panel is removed from the loom, it is sewn together. For a teen wrap all 26 pegs. This is a variation of a pattern originally published by Provo Craft. The red round loom can also be used to knit these leg warmers. (I prefer the red round loom because you don't get variations of gap between pegs like you do around the ends of the long looms.)


    1. Holding 2 strands of the grey yarn as if they are one, cast on by e wrapping the loom one time.
    2. E wrap the loom.
    3. Knit.
    4. Repeat steps 2 - 3 until you have knitted 4 rows. (When you reach the end peg, knit it twice. Once when you reach the end of the row and again when you start the next row.)
    5. Change the color to 2 strands of red yarn and repeat steps 2 - 3 until you've knitted 4 rows.
    6. Change the color to grey and repeat steps 2 - 3 until you've knitted 4 rows.
    7. After you've knitted 7 red stripes and 8 grey stripes, you will have grey on the loom. Continue on with the 4 more grey rows, for a total of 8 rows to make the grey band.
    8. Cast off the loom, by sewing through each loop. (Don't use a crochet cast on or off. It makes the ends to tight to stretch when the leg warmers are put on.)
    9. Cut the working yarn to about 24 inches. Turn the grey band under (toward the side of the knit you don't want showing outward). Whip stitch it down to form a cuff.
    10. Also with the side of the knit you don't want showing facing outward, sew a seam up the side of the knit.
    11. Cut the working yarn and tie a square knot.
    12. Turn the leg warmer right side out so the seams are no longer showing.
    13. Repeat the steps above for the second leg warmer.

    **Note: To make these for a toddler, use 14 pegs and knit a total of rows. 

    Sunday, February 2, 2014

    Garter Stitch

    Similar to the crossed knit stitch, the garter stitch is created by alternating each row of the knit. In the garter stitch we alternate rows of knit and purl.

    1. Cast On
    2. Row 1: Knit all the way across (no wrap stitch seen in video 1)
    3. Row 2: Purl all the way across (purl stitch seen in video 2)
    4. Repeat steps 2 and 3 until the knit is the desired length.
    5. Cast Off

    The Crossed Knit Stitch

    The crossed knit stitch pattern is created by alternating rows of e wrap stitches with no wrap stitches.
    1. Cast on.
    2. Row 1: E wrap and knit one row.
    3. Knit across another row using the "no wrap."
    4. Repeat step 2 and 3 until your reach the desired length.
    5. Cast off.
    The first video demonstrates the e wrap in step 2.
     The second video demonstrates the no wrap in step 3.

    How to Make Cables on a Round or Long Loom

    Knifty Knitter Round Loom Cables

    In the photo above, by Elisa Padilla, a series of many cables are knitted on the blue round loom and made into a headband. You can see more of the Elisa's cables as she knits them at the bottom of this page.

    These instructions are for a basic left cross cable. Following them will create a sample swatch that can be used to learn the technique. Any yarn or loom can be used to practice. Skills needed are the ability to knit stitch, purl stitch and crochet cast on.
    1. Using any round loom chain cast on 8 pegs going clockwise.
    2. Rows 1-3: Purl 2, Knit 4, Purl 2
    3. Row 4: Purl 2, Use the instructions for "Left Cross Cable" purl 2.
    4. Repeat steps 2 and 3 until swatch is the desired length.

      Left Cross Cable

    1. Bring the working yarn to the inside of the loom and across the next 2 pegs.
    2. Then back to the outside and loosely knit the next 2 pegs.
    3. Remove the loops from the 2 pegs that you just knitted and place them onto a cable needle. Let it hang on the inside of the loom.
    4. Bring the working yarn to the inside of the loom, across all 4 pegs and back to the other side. 
    5. Then to the outside before the first skipped peg. 
    6. Knit the 2 skipped pegs, then use the tool to move them to the empty pegs. (Keep them in the same order and tighten them to prevent elongated stitches.)
    7. Place the stitches from the cable needle on the first 2 pegs you just moved over, making sure the stay in the same order.
    Knifty Knitter CablesKnifty Knitter Cables

    Visit Elisa's Store at https://www.etsy.com/shop/mykillercreations

    How to Knit an I Cord

    An I cord is a long tube of knit used for purse straps, handles, or afghan edging. You can make an I cord using the small 6 peg side of the spool loom. It can also be done using 6 pegs along the edge of a long loom. To make an I cord on the spool loom, simply knit in a continuous spiral until the cord reaches the desired length. To knit an I cord on a long loom, follow these instructions:
    1. Crochet cast on 6 pegs around the end of the loom. (You will have 3 pegs on 1 side, 2 pegs on the other side and 1 end peg wrapped, for a total of 6.)
    2. Pull the working yarn across the loom and loop it around the first peg you cast on. 
    3. Continuing around the loom, e wrap the remaining pegs. 
    4. When all the pegs have 2 loops, knit.
    5. Continue to knit until your I cord reaches the desired length. I will help to tug on the I cord below the loom occasionally.

    Hat Sizing

    There are some variations to the size of a hat. The loom, the stretch of the yarn, and the stitch used all influence the correct size. The following sizes work for most hats. The best way for beginners to judge correct loom size is to get started knitting a hat. Advanced loom knitters can achieve the gauge called for in the pattern to perfectly size the hat.

    24 peg loom (Knifty Knitter blue)         preemie or doll            9-14 inches
    31 peg loom (Knifty Knitter red)          infant or baby              14-18 inches
    36 peg loom (Knifty Knitter green)       child or small woman   18-20 inches
    41 peg loom (Knifty Knitter yellow)      adult                            20-24 inches
    hat loom (Knifty Knitter purple)            adult

    Saturday, February 1, 2014

    Woven Top Hat Pattern for the Knifty Knitter Purple Hat Loom

    Woven Top Hat
    This is an modified version of the "Flat-Topped Hat" from the Provo Craft booklet "Knifty Knitter Adult Hat Loom Patterns," This hat is flat at the top and begins by weaving the yarns on the loom, rather than knitting. The body of the hat is 9 rows of e wrapped knit. The brim of the hat in the original pattern alternated knit and purl stitches to make a ribbing around the brim. My thoughts are that this would make a great Easter basket if a handle were added. There is a Provo Craft pattern for a backpack that starts much the same with a woven bottom.
    • Knifty Knitter Purple Hat Loom
    • Wool-Ease Thick and Quick
    • Knifty Knitter Hook

    1. Before you begin number the pegs on the purple hat loom. Hold the loom with the pegs pointing toward you. The anchor peg should be positioned at the bottom. Peg 1 will be just above the anchor peg and slightly to the right. Continue numbering to 48 in a counter clockwise direction.
    2. Measure 20 yards of yarn fold it in half and using two yarns as if they are one prepare the loom.
    3. Wrap the anchor peg.
    4. Pull the yarn across the loom and wrap peg 24. 


    5. Cross the loom back to peg 48. Wrap under and pull yarn across to peg 2.
    6. Pull the yarn up to peg 23. Weave over and under to peg 25. 
    7. Cross back to 47. Wrap peg. Weave over and under to peg 2.
    8. Cross to peg 22. (Continue in this manner until you get to peg 13.)
    9. Go around peg 37 and weave back. This finishes the hat top.
    10. Ewrap the loom and knit 9 rows.
    11. For the brim - Knit 5 rows of ribbing, by alternating knit and purl stitches. (k,p,k,p,k,p,etc.)
    12. Crochet cast off.
    Knifty Knitter WeaveKnifty Knitter LoomsKnifty Knitter Woven Top Hat Knifty Knitter Booklets from Amazon

    Friday, January 31, 2014

    Beginner Scarf Pattern

    This beginner scarf can be done on any of the long looms. The scarf is a good project for beginners to get a feel for loom knitting. Like any flat, one panel knit, the edges of this scarf will curl a bit. That can be minimized by wrapping the pegs loosely.

    You will need:
    • A Knifty Knitter Long Loom
    • Knifty Knitter Hook
    • Lion Brand Jiffy Yarn


    1. Secure the yarn to the anchor peg at the end of the loom.
    2. Ewrap the loom to the 12th peg.
    3. Reverse direction and wrap the loom back to the 1st peg.
    4. Knit off using the hook.
    5. Wrap the loom again.
    6. Continue wrapping and knitting until the scarf measures 50 inches.
    7. Cast off the loom. 
    8. Cut 12 inch peices of yarn and tie fringe to the ends of the scarf.

    Flat Top Hat Pattern

    The flat top hat is flat at the top because it's finished with a horizontal seam, rather than gathered. This pattern is knitted with 2 yarns as if they are one. You can use fun fur for one of the yarns if you wish. For a small woman's hat the green round loom is used. If you like a larger hat, use the purple hat loom, or the extra large yellow loom.


    1. Knit 20 rows. 
    2. Make a brim by pulling the first row up through the center of the loom. Put the loops back on the pegs. Knit.
      (Now you have a double thickness brim.)
    3. Knit 20 more rows.
    4. Crochet cast off.
    5. Turn the hat inside out. Whip stitch the top closed as a flat seam, or crochet it closed as a flat seam, whichever you prefer.
    6. Tie off the yarn. 
    7. Turn the hat right side out.


    Easy Peasy Rolled Brim Hat for Kids


    Knifty Knitter Hat
    This pattern is for young kids or babies. The red round loom is used. If you want a slightly larger hat for an older kid, try the green loom.
     

    You will need:
    • Green Round Knifty Knitter Loom
    • Wool-Ease Thick and Quick Yarn (or scrap yarn)


    1. Knit 30 rows
    2. Cut the working yarn 12 inches long.
    3. Using the working yarn and a yarn needle, sew through each loop as you remove it from the loom.
    4. Pull it tight to close the hat and tie a square knot.
    5. The brim of the hat will naturally roll up.


    Patterns You Might Like: