Saturday, April 26, 2014

Knifty Knitter Poncho with Collar

 
Knifty Knitter Poncho Pattern
The original pattern is by Clella Gustin and published by Provo Craft.

Knifty Knitter Poncho Pattern

SUPPLIES

Provo Craft Tools

Other Supplies

  • crochet hook size I
  • 4 skeins of Lion Brand Wool-Ease thick and quick large (if you want your poncho longer, add 2 stitches per 1" of extra length you want)

Skill level: Beginner

Step 1: Cast on, or e wrap, 42 pegs on the blue loom.

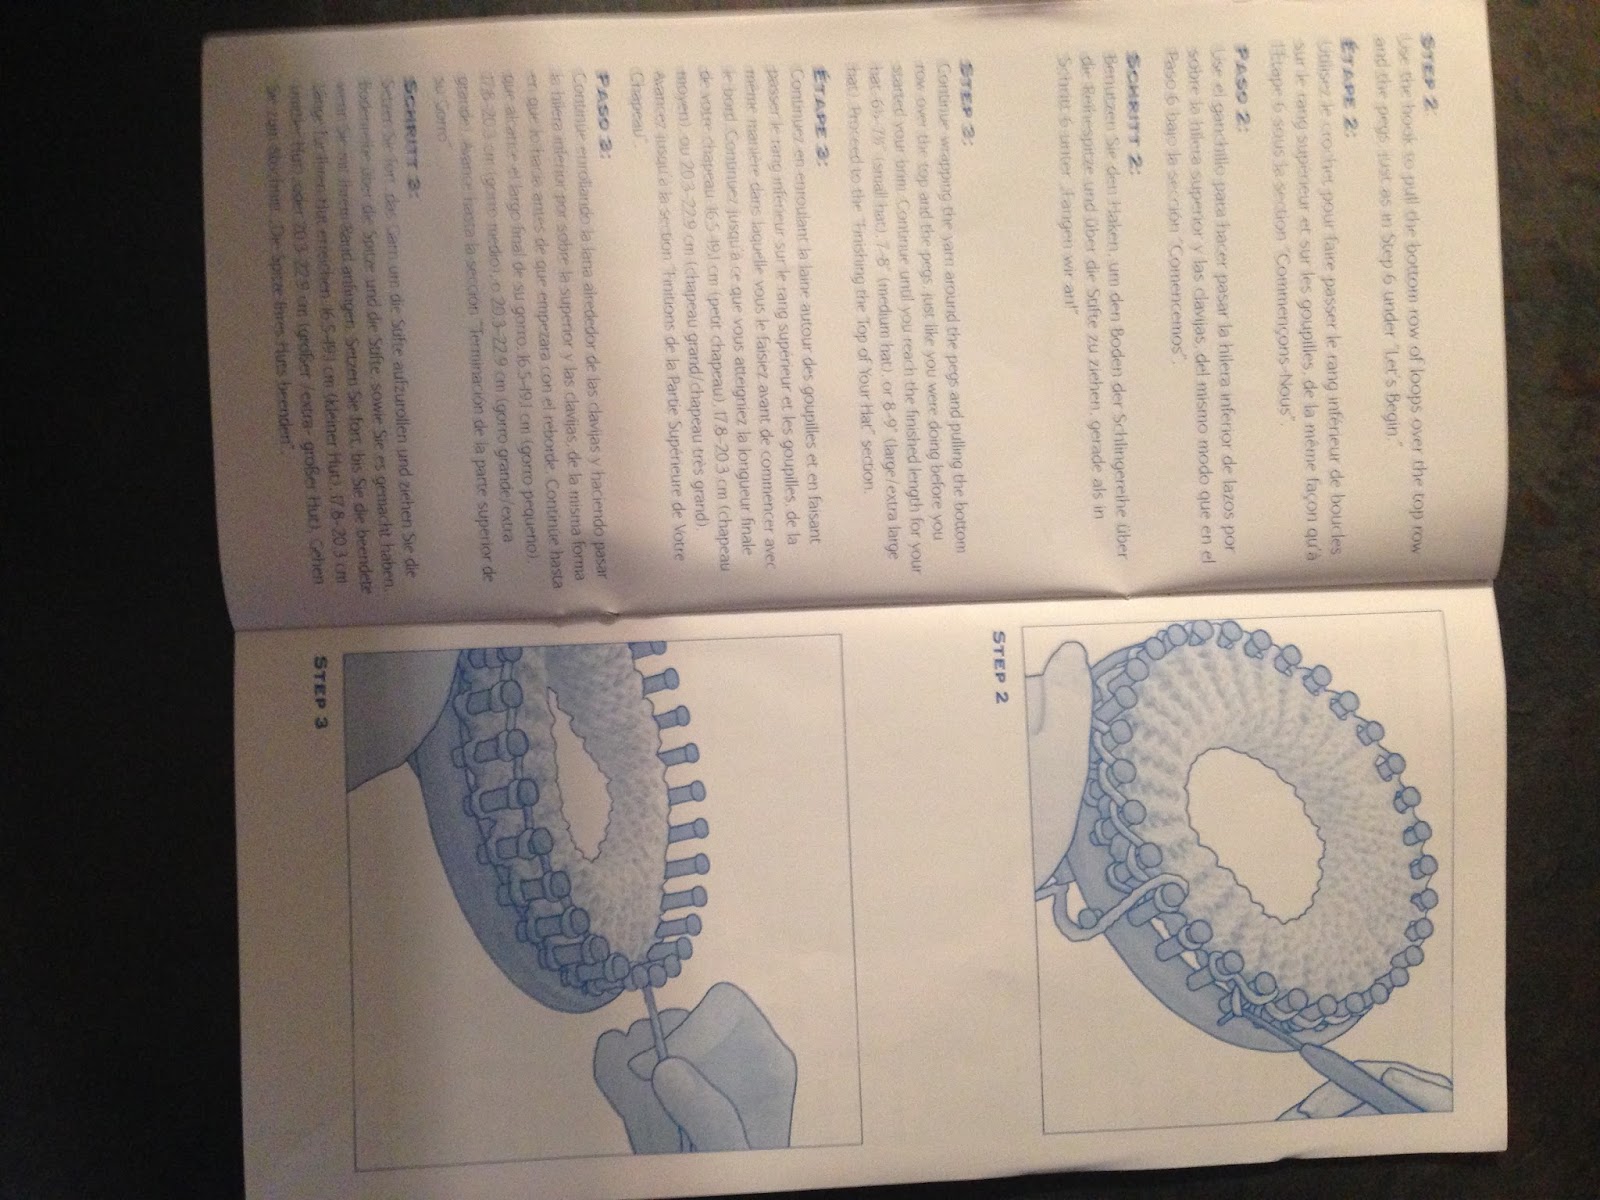
Step 2: Knit 2 panels that are 33" long (they will be 20" wide). This is equivalent to about 110 rows in each panel.

Step 3: Sew panels together as shown in diagram. Leave about 22 loops on each side of both panels for the neck. Slip the knitting through the center of the yellow loom, and slip the stitches on the pegs to the yellow loom. Knit 9 rows.

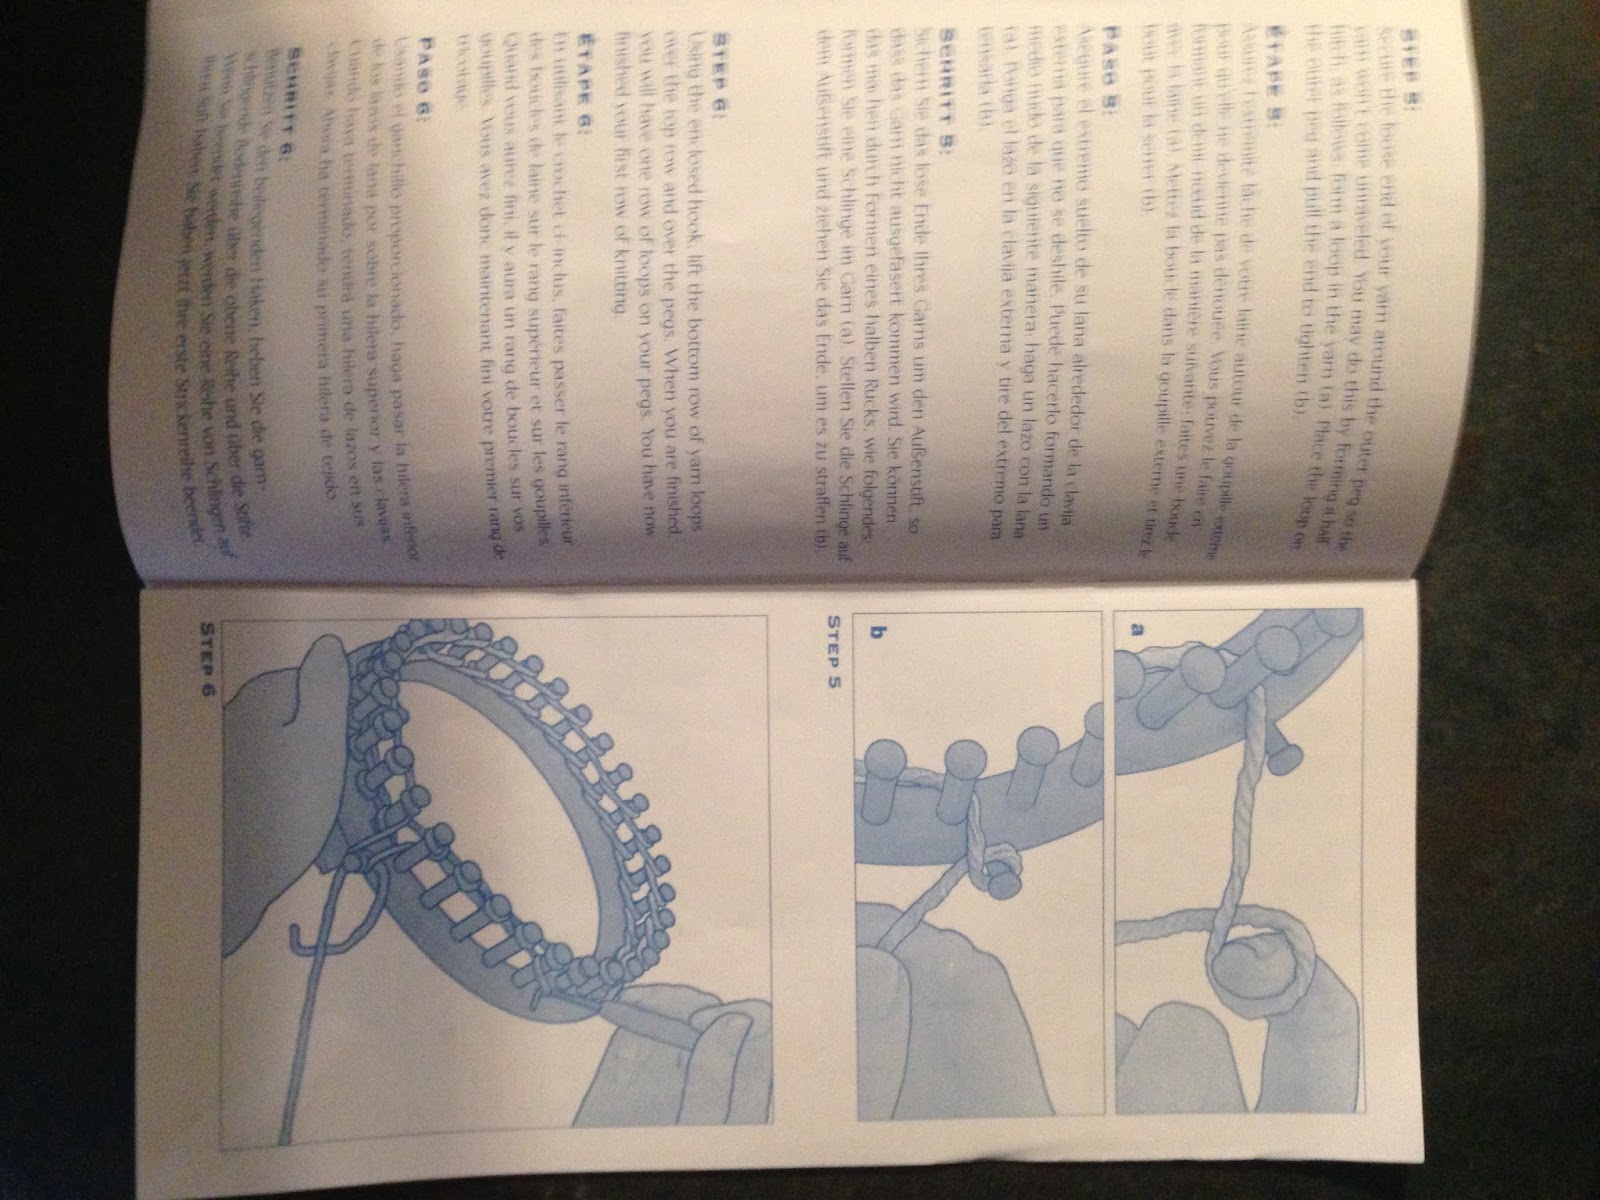
Step 4: Using a crochet hook, do a single crochet around the outside edge and around the neck piece.
Knifty Knitter Poncho Instructions

Here is the poncho knitted by Jeannette Miles using Bernat Softee Chunky yarn, which is weight 5. Isn't it gorgeous!

Poncho for the XL Round Knifty Knitter


Friday, April 25, 2014

Funky Vest for the Knifty Knitter Blue Long Loom

Skill level: Advanced

When you are measuring, lay the project flat and do not stretch the knitting. Knitting measures approximately 4 rows per inch.

Step 1:
Using a contrasting yarn, tie pieces of yarn around pegs 13, 20, 27, 35, 42, and 49. (See diagram.) Pegs 13 and 20 correspond to the left armhole. Pegs 41 and 49 correspond to the right armhole. Pegs 27 and 36 represent decreasing for the neck hole.

Step 2: Starting on peg 1, wrap the loom with yarn. Don't wrap the peg on the very end (peg 62). Knit for 7 inches (27 rows) on the 61 pegs.

Step 3:
BACK: On the 28th row you should be knitting from the right to the left. Knit to peg 49 (the peg with the marker on it). Wrap the next 8 pegs very loosely. Take the loops from pegs 49 and 48, and pull the loop from peg 48 through the loop from peg 49. Then take the loop from peg 47 through the loop from peg 48. Continue in this manner until you have decreased the stitches between the markers, including the loops on the marked pegs (pegs 49 and 42). Knit across the back part of the vest to the marker on peg 20 and decrease the stitches between the markers on peg 20 and peg 13. Knit to the end of the row. If there is any remaining yarn, you can leave it attached and use it for the left front.

Step 4: Attach another piece of yarn as a marker on peg 20, and knit the back section until you have knit 9 ½", or 38 rows.

Step 5: NECK: Knit the 6 stitches to the marker on peg 36 and decrease the stitches between pegs 35 and 27 (they have markers on them). Knit the left side until you have knitted 4". Take off of the loom. Attach a piece of yarn as a marker on peg 35 and knit 4", or 16 rows. Take off of the loom.

Step 6: LEFT FRONT: Using the attached yarn, knit 8". Start decreasing on the front side of the vest—one stitch every inch, or every 4 rows, repeated 6 times. Take knitting from the loom.

Step 7: RIGHT FRONT: Attach yarn as a marker on peg 49 and knit 8". Starting on the front side of the vest, decrease one stitch every inch, or every 4 rows, repeated 6 times. Step 8: Sew the shoulder seams together. You can add some fringe pieces to make it funky.


Provo Craft Tools

  • Knifty Knitter Long Loom (blue)
  • hook
  • yarn needle

Other Supplies

  • 3 skeins of yarn (sample used Lion Brand Trellis, color Pastel Garden)

Receiving Blanket for an Infant

Infant Receiving Blanket for Blue Knifty Knitter Loom
Skill level: Beginner
Dimensions: measures 27" x 27" including shell stitch

Step 1: Using one strand of yarn, secure yarn to anchor peg of loom. E wrap up one side of loom, around end, and down other side. Turn on last peg and wrap going opposite direction. When you have two rows wrapped on the loom, knit by pulling the bottom loop over top loop.

Step 2: Continue wrapping and knitting for 100 rows to make square. To stabilize this loose weave, do single crochet around entire shawl. Crochet 2 single crochet stitches in between each row and 2 single crochet stitches in between each knitted end. Finish with simple shell stitch around single stitch.

Step 3: Create border around shawl. To create the stitch on the sample, chain 3 dc* in same stitch. Skip 2 stitches and dc 4 times in next stitch. Continue around shawl, skipping 2 stitches and doing 2 dc in first row and skipping 2 stitches and doing 4 dc in next stitch. For next row, do dc's in middle of shells.

Note: *dc = double crochet SUPPLIES Provo Craft Tools Knifty Knitter Long Loom – Blue Knifty Knitter hook Other Supplies Crochet hook: size H 2 skeins of baby yarn of your choice

SUPPLIES

Provo Craft Tools

Other Supplies

  • Crochet hook: size H
  • 2 skeins of baby yarn of your choice

Tote Bag for the Knifty Knitter Green Round Loom

Knifty Knitter Tote Bag

Skill level: Intermediate

Step 1: Using both yarns held together, e wrap the loom and knit 25 rows. Start and end the knitting at the peg on the side of the loom.

Step 2: Cut the end of the yarn you are wrapping with, leaving about 36", and thread it onto the yarn needle. Start to take the loops from the loom by threading through the loop on peg 1, then through the loop on peg 36, then the loop on peg 2, then the loop on peg 35. Continue back and forth in this method until you have taken all of the loops from the loom. Pull the yarn until the loops are woven together to make the bottom flat. Tie a knot in the yarn, and weave the ends into the piece.

Step 3: Single crochet around the top of the bag.

Step 4: Bag Handle: Holding both yarns together, wrap 4 pegs and knit back and forth for 134 rows, or 33". You may lengthen or shorten the handle if you wish.

Step 5: To make the clasp strap, wrap 4 pegs and knit for 15 rows.

Step 6: Using the cotton yarn, sew the handle to the sides of the bag at the fold sides. Sew the clasp to the middle of the back of the bag, and embellish with buttons, beads, or other accessories of your choice.

SUPPLIES

Provo Craft Tools

  • Knifty Knitter Round Loom (green)
  • yarn needle
  • hook
  • yarn needle

Other Supplies

  • H or J crochet hook
  • 1 skein of Sugar n' Cream (wine or color of choice)
  • 1 skein of Lion Brand Kitchen Cotton (color of choice)
  • 1 skein of Lion Brand Thick and Quick (Adirondacks)
  • clasp or buttons for a closure (the ones on the sample were made from coconut shells; you can make them out of ⅛" wood or gourd)

The Big Purple Bag

 
Knifty Knitter Bag

Skill level: Intermediate

Note: This bag can be lined, but it is a great bag to go shopping with. It stretches so big that you can put a lot of packages in it. The handles are comfortable and strong enough to support a heavy load.

Step 1: Flat piece of knitting: E wrap the loom, starting with peg 2 and ending with peg 31. Turn on peg 31 and e wrap back to peg 2. Knit 16 rows in this manner. (This piece will eventually fold over the handle.)

Step 2: Main body of the bag: Use the pegs on both sides of the loom (but not the pegs on each end of the loom) to knit in the figure 8 pattern. This will hold the stitches for the next rows. Wrap back and forth (fashion stitch), and then knit these stitches over. You will knit one stitch over on one side and two stitches over one stitch on the other side.

Step 3: Using the Bernat Disco yarn (this should be at peg 2), knit in with the main yarn for the next 6 rows. Cut the Bernat Disco and continue knitting until the knitting measures 24" of the main color of yarn (end at peg 2). Add in the Bernat Disco for the next 6 rows and then cut this yarn.

Step 4: Knit one row using only the main color (this will leave you at peg 31). Take the loops from the other side of the loom and place them over the corresponding pegs in the row you just knitted. You will now have 2 loops on the pegs on the right side of the loom. Wrap back in the single stitch and knit the 2 loops over the wrapped one. Continue knitting the single stitch for 16 rows.

Step 5: Using the main color and the Spool Loom (the end with 8 pegs), knit a tube 28" to 34" long (instructions can be found in the Spool Loom packaging). You will need 2 of these tubes.

Step 6: Fold the single knitting over. Using the yarn needle and yarn, sew to make a tube to string the handles through. Sew up the sides about half way. Thread the handles through the tube. Sew the ends together and slip these sewn ends to the middle of the tube.

Step 7: Sew the sequins on with sewing thread or loops of the yarn. Sew each one on separately, so that the bag can stretch.

Provo Craft Tools

Other Supplies

  • 1 skein Red Heart Super Saver (Amethyst)
  • 1 skein Bernat Disco (Motown Mauve)
  • Sequins (gold)

Rectangle Loom Instructions

Knifty Knitter Purple Rectangle LoomThese are the instructions that are inclosed in the packaging for the purple rectangle loom.

rectangle.loom


Hooded Scarf


Knifty Knitter Hooded Scarf
Instructions


1. Using double strands of yarn wrap over to peg 22 and back again.
Hooded Scarf Pattern
2. Knit 235 rows (about 75 inches long) and fold in the middle.

3. Sew with a needle and one strand of yarn from the middle fold along one side 8-1/2 inches to form a hat to go on top of your head. (see diagram)

4. Now wrap the rest of the scarf around your neck.

5. (optional) Using Provo Craft's Pom-Pom Maker cut the fringe (7 inch lengths of yarn folded in half to make 3 inches of fringe) the desired length and add to the ends of the scarf.


Blue Long Loom

Here are more scarf patterns you may like to try:
http://kniftyknitterweekly.blogspot.com/2010/03/hourglass-scarf-for-the-blue-round-loom.htmlhttp://kniftyknitterweekly.blogspot.com/2010/03/braided-scarf-for-the-spool-loom.htmlhttp://kniftyknitterweekly.blogspot.com/search?q=honeycomb

Change Purse

Knifty Knitter Change Purse InstructionsKnifty Knitter Change Purse
This purse uses fabric instead of yarn. After cutting the lining for the purse, the remaining fabric is cut into strips. These strips are used as yarn while looming. This is an interesting project if you have sewing skills and want to try something new.

Skill: Advanced

Instructions
1. Cut a square piece about 7X9 for the lining of the purse.
2. Using the rotary cutter and the mat cutter, cut the rest of the yard of fabric INTO 1 1/4"stripes on the bias. (click on bottom picture for a detailed view) This gives the fabric have a little stretch.
3. Sew the strips together on the sewing machine. (click on bottom picture for a detailed view)
4. Try to keep the fabric folded so that the right side is out it will make your project much brighter to have the right side out. You may want to iron on fold.
5. E wrap the fabric strips loosely around the pegs. I used 16 pegs and knit about 26 rows. When I fold the knit work in half it measures 4"X 7" the finished size of the purse.
6. Using the square of fabric fold it in the middle then iron about 3/4 of an inch. On the long sides and put the zipper in.
7. Sew the back side of the zipper to the right side of the fabric, and sew up the side seams. (click on bottom picture for a detailed view)
8. Hand stitch the sides of the knitted square and hand stitch the around the zipper.

What you will need:

Provo Craft Supplies
Other Supplies
  • Needle and thread
  • One yard of cotton fabric.
  • A rotary cutter and mat
  • A ruler.
  • A 7" zipper.

Tassel Neck Pillow

Knifty Knitter Pillow
Instructions
1. Using Sensations Angel Hair yarn, e-wrap the first row of the yellow loom.
2. Use a purl stitch on the remaining rows of the loom. To purl stitch, lay the wrapping yarn across the front of the pegs below the loops. Using the Knifty Knitter hook, go under the loop and pull the wrapping yarn up through the loop. Take the original loop off the peg and replace it with the loop that is pulled through. (See Purl Stitch on the Knifty Knitter page at www.ProvoCraft.com for step-by-step instructions with images.)
3. Purl stitch until knitting is 18" long or desired size. Remove knitting from loom loosely and sew up one end to make a pillow form. Stuff and sew up the other end.
4. Using Lion Brand Vanna's Choice yarn, make 4 tassels using the Pom-Pom and Tassel Maker. Attach one tassel to each corner of pillow.

What you will need:

Provo Craft Supplies
Other Supplies
    Knifty Knitter Long Loom Set
  • Crochet hook
  • 1 skein Jo-Ann Sensations Angel Hair (3.5 oz/100g), Purple
  • 1 skein Lion Brand® Vanna's Choice, Medium (3.5 oz/100g), #860-147 Purple
  • Yarn needle
  • Stuffing for pillow

Eight Wrap Scarf

Knifty Knitter Scarf


Instructions:
1. Start wrapping the yarn around loom pegs in a figure-eight pattern as shown in the instructions that come with the loom. Be sure to leave a long piece of extra yarn at the start of the wrapping, to be used later in step #4.
2. Wrap the loom just half way up the loom, then turn around and go back. You will use just 18 of the pegs.
3. Continue the knitting process as shown in the loom instructions until scarf is desired length or until the skein of yarn is finished. Be sure to leave another long piece of yarn at the end to use in step #4. Finish the edge of the scarf as shown in instructions.
4. Using a needle, thread the ends of the long pieces of yarn back up the sides of the scarf about 4", then wrap the remaining yarn several times around the scarf to pull it together. (See photo.) Tie off yarn and the scarf is finished.
What you will need:
  • One Skein JIFFY yarn by Lion Brand® Yarn Company (JIFFY is a velvety soft mohair-look yarn.)
  • Knifty Knitter Long Loom (purple) and Pick by Provo Craft®

Long Loom Instructions

These are the long loom instructions that come with each set.
long.loom


Round Loom Instructions


Knifty Knitter Slippers Pattern

Knifty Knitter Slippers Pattern
Instructions:
1. The instructions are written to fit a ladies size 8 or 9 shoe. You can adjust to fit your foot. Use 2 pieces of yarn for all of the slippers.
2. Knitting a flat piece of knitting using 30 of the pegs. Start on peg 1 and e wrap to peg 29 then wrap around peg 30, turn and reversing directions wrap back to peg one. Knit 15 rows.
3. You are knitting from the heel to the toe this may help if you can think of this.
4. You are now on the 15th row, decrease or take off the next 6 stitches. Knit to the end of the row and decrease off the next 6 stitches. Continue knitting on the 18 stitches for 18 more rows.
5. Fold in half and sew up the heel. Run a thread through the loops on the 18 pegs and pull tight. Sew up the top of the slipper to the arch or to the cuff.
6. Crochet a chain about 24 inches and thread through the ankle. Attach a pom-pom on the end of the chain and tie a bow.
Now put on your comfy slippers and relax!

What you will need:

Provo Craft Supplies
Other Supplies
  • One skein of yarn
  • Yarn needle
  • Crochet hook


Knifty Knitter Baby Afghan

Knifty Knitter Baby Afghan

Instructions
Use 2 strands of yarn as one for the complete project.
1. Using the Knifty Knitter Round Loom Red (and all 31 pegs), panel knit four panels of knitting using the e-wrap. Knit first panel: blue yarn for 48 rows, white yarn for 10 rows, pink yarn for 48 rows, white yarn for 10 rows, green yarn for 48 rows, white yarn for 10 rows, and then yellow yarn for 48 rows.
2. Knit second panel: pink yarn for 48 rows, white yarn for 10 rows, green yarn for 48 rows, white yarn for 10 rows, yellow yarn for 48 rows, white yarn for 10 rows, and then blue yarn for 48 rows.
3. Knit third panel: green yarn for 48 rows, white yarn for 10 rows, yellow yarn for 48 rows, white yarn for 10 rows, blue yarn for 48 rows, white yarn for 10 rows, and pink yarn for 48 rows.
4. Knit fourth panel: yellow yarn for 48 rows, white yarn for 10 rows, blue yarn for 48 rows, white yarn for 10 rows, pink yarn for 48 rows, white yarn for 10 rows, and then green yarn for 48 rows.
5. Lay first and second panels face-up on a flat surface. Connect with a mattress stitch to hook them together. To use the mattress stitch, line up the matching white sections from the two panels. Thread a long strand of white yarn through your yarn needle. With the edges of the two panels side by side, sew with the yarn needle through the loops on either edge. Pull tight once you have sewn up the gap between the panels, knot, and weave any ends into the panels.
6. Using the yarn needle and the ribbon, sew over the seam. Sew in about every fifth row of knitting. You will be sewing one strand of ribbon one way, and then using a second strand of ribbon to sew the opposite direction (see close-up picture). Tie a bow on each end of the rows

What you will need:
Provo Craft Supplies
Other Supplies
  • 4 skeins yellow worsted weight yarn
  • 4 skeins blue worsted weight yarn
  • 4 skeins pink worsted weight yarn
  • 3 skeins white worsted weight yarn
  • Ribbon: white 1/4" or 1/2" ribbon (the 100% polyester ribbon will wash very well)
  • I used: 4 skeins yellow worsted weight Jamie Classic by Lion Brand® Yarn 4 skeins blue worsted weight Jamie Classic by Lion Brand® Yarn 4 skeins pink worsted weight Jamie Classic by Lion Brand® Yarn 3 skeins white worsted weight Jamie Classic by Lion Brand® Yarn

Thursday, April 24, 2014

Leg Warmers with Stripes

Knifty Knitter Striped Leg Warmers


Instructions
1. Note: This set of warmers was made from the classic wool. They are nice and warm and the knitting looks great. Be aware, however, that when the wool is washed it might shrink. If you want them to stay the size that you have made them, they will have to be dry-cleaned.
2. 1. Using two strands of Natural Mix yarn as one, e-wrap (wrapping loops on pegs that look like series of lowercase e’s) two times around loom and knit off (pulling bottom loop over top loop and peg).
3. 2. Knit 10 rows and carefully reach inside loom and place loops from first row back over pegs. This makes brim or cuff for top of the leg warmer. Knit this row.
4. 3. Continue knitting until leg warmer is 14" long (or desired length) using following pattern: 6 rows Rich Red yarn Next 4 rows Natural Mix yarn Next 4 rows Rich Red yarn Next 4 rows Natural Mix yarn Next 4 rows Rich Red yarn Next 4 rows Natural Mix yarn Next 4 rows Rich Red yarn Next 4 rows Natural Mix yarn Next 4 rows Rich Red yarn Next 4 rows Natural Mix yarn Next 4 rows Rich Red yarn Next 4 rows Natural Mix yarn Next 6 rows Rich Red yarn Next 6 rows Natural Mix yarn
5. 4. Using crochet hook, take first two loops off loom and pull second loop through first. Continue on around to take all loops off loom.
6. 5. Knit second leg warmer using directions above. Add beads, button, bells, or whatever you would like to decorate.


What you will need.
Provo Craft Supplies
Other Supplies
  • 1 skein Patons® Classic Merino Wool Rich Red
  • 1 skein Patons® Classic Merino Wool Natural Mix
  • Crochet hook
  • Yarn needle

Knifty Knitter Flag Blanket

Knifty Knitter Flag Blanket
This project measures 40.5" x 60" -- This project is done in panels and can be easily taken with you in your travels.

Instructions:
1. You will be using 2 strands of yarn as one throughout the entire project.

2.
 Split panels: Use the Knifty Knitter Round Loom in Blue and 2 strands of blue yarn to e-wrap 9 pegs. Wrap these 9 pegs then knit back and forth for 36 rows. Change to the red yarn and knit 54 more rows. Create 4 of these panels.

3.
 E-wrap the loom with the blue yarn and knit 36 rows then change to the white yarn and knit 54 more rows. Create 3 of these panels.

4.
 Long panels: E-wrap 9 pegs on the loom with the white yarn and knit 90 rows. Create 3 of these panels.

5.
 E-wrap 9 pegs on the loom with the red yarn and knit 90 rows. Create 3 of these panels.

6.
 Use the yarn needle and sew the stripes together to make blanket. Cut the 13 stars from felt and sew on with sewing thread and needle.

Note: When this blanket was first knit the designer knit the blue background using the Knifty Knitter Round Loom Yellow, all in one piece. Because the pegs on this loom are wider apart it knits a different gauge than the blue loom, which the stripes were knit on. The pegs are closer together on the smaller loom. It was very hard to make the blanket sew together right, so we have changed the pattern and hope that you will enjoy creating this fun blanket.

What you will need:
Provo Craft Supplies
Other Supplies
  • 2 skeins blue yarn
  • 4 skeins red yarn
  • 3 skeins white yarn

Beaded Hat

Knifty Knitter Beaded HatKnifty Knitter Bead Instructions

Instructions
1. You will be making a regular hat just like the instructions that came with the looms.
2. Using one strand of the Jiffy yarn, thread on 93 beads. (This sample used mini pony beads'"white, yellow, green and blue.) String the beads on the yarn and push them down the yarn strand about 5 or 6 yards.
3. Knit 10 rows. On the 11th row, take the yarn to the outside of the loom and lay the yarn over the groove in the peg. The bead will position between the pegs.
4. Knit the loop over the yarn between the beads. Hold the yarn loosely when knitting the bead row.
5. Knit 3 rows and then another row of beads. Continue until you have 3 rows of beads on the brim of the hat. Knit one more row, then pull the inside of the hat up and put the bottom row on the loom to make the brim.
6. Continue knitting 15 more rows and string a piece of yarn through the loops on the loom and draw up to make the top.
7. Top knot: Using some of the left over beads, thread them on the yarn and wrap the yarn so that the beads end up in the middle of the loops (not all of the loops have beads). Tie in the middle and attach to the top of the hat.
8. This hat will fit a small child. The colors and the way you add the beads can make for a wide variety of styles and looks.
What you will need:
Provo Craft Supplies
Other Supplies

Wednesday, April 23, 2014

Stuffed Bunny Rabbit

Knifty Knitter Bunny Pattern
Instructions
1. Using three loops, taking one loop over two loops, create the legs using only one side of the pink loom. Start in the center on the pink loom (6 pegs from the edge of the loom) and go around the corner to the center or 6th peg from the edge on the other side. Create a leg that is 5.5 inches long. Knot and cut the string, but do not remove the leg from the loom.
2. Begin knitting on the other side of the loom to create the other 5.5-inch long leg.
3. When finished, begin knitting all the way around the loom to create an 11-inch long tube. The head will be 5.5 inches and the body will be 5.5 inches long.
4. Sew through each loop and gather all the loops tightly together at the top with the yarn needle and knot. Turn the bunny inside out.
5. Create the arms by using 10 pegs and knitting back and forth until you have 4 inches. Gather the loops together and sew up the side of the arm. Turn inside out. Stuff with stuffing. Create two.
6. Stuff the head of the rabbit by creating a ball of stuffing the size of a large softball. Create a small baseball amount of stuffing for the snout. Sew 5.5 inches down around the neck and pull to desired look. Add ribbon to the neck. Stuff the body as desired. Add a pom-pom to the back for a tail.
7. Gather up the bottom of the leg by sewing in and out through each bottom loop, pull tight and knot. Sew up the leg, stuff both legs with stuffing, and sew down the other leg and gather the bottom of the leg, knot, and hide threads in bunny leg.
8. Sew an oval around the baseball amount of stuffing in the face. With the pink embroidery floss sew an upside down triangle with a line coming down the middle ending in a smile. The eyes are three buttons sewn together.
9. Sew the arms on just below the neck on each side by sewing in the arm and into the body all the way around the arm.
10. The ears are created by using 7 pegs and knitting for 8 inches, then reducing the two ends to 5 pegs and knitting two more rows, then reducing the ends to 3 pegs and knitting for two more rows, and finally reducing to one peg and pulling the thread through and knotting the yarn. It is optional, but you can sew on pink material to the ribbed side of the ears before sewing the ears on the bunny head.

What you will need:

Provo Craft Supplies
Other Supplies
  • 2 Skeins of yarn (Patons Divine brand, 5 Bulky 3½ oz./100g, 06011 Soft Earth)
  • ¼ yard of pink material
  • Pink embroidery floss for the nose and mouth
  • Buttons for eyes (or whatever you choose)
  • Ribbon for around the neck
  • Stuffing material
  • Yarn needle

V Neck Sweater

Knifty Knitter Sweater

Knifty Knitter Sweater InstructionsKnifty Knitter Sweater Instructions
1. This a women's size large X-large
2. Body: using both yarns together wrap all of the pegs (41) and knit a flat piece until it is 17" long. Take the piece off of the loom by crocheting a single crochet in the first loop and continue to the next peg and crochet very loose, so that it does not pull up the knitted piece. You will need to make 2 pieces; one for body front and one for back.
3. Sleeves: using both yarns together wrap all of the pegs (41) and knit a two flat pieces until they are 12" long.
4. Construction: lay the front and back pieces together side to side. Put the binding off ends to the top. Sew with a yarn needle and one strand of yarn (the knitting worsted yarn is best) the side seams. See instruction diagram.
5. Mark the center front and back. Sew the sleeves from the centers to the under arm seam. See diagram. Put the bind off sides to the neck (these ends are a little more secure). Do a simple single crochet stitch around all of the outer edges, using one strand of the knitting worsted yarn.

What you will need:
Provo Craft Supplies
Other Supplies

Tuesday, April 22, 2014

Loopy Boa

Loopy Boa InstructionsLoopy Boa Pattern
Instructions
1. Using 2 strands of yarn, wrap first 3 pegs. Wrap the 3 pegs again and knit off (lift bottom 2 loops over top 2 loops and off peg).
2. Make fringe loop on left side of loop by bringing yarn to inside of loom, skip 9 pegs and wrap around 10th peg. Wrap around outside of loom, around all 10 pegs then bring yarn to inside of loom behind 3 pegs with stitches (see picture to right).
3. Wrap the 3 pegs and knit off.
4. Using tool, lift off fringe loops that are around the 10 pegs. Let loops drop to inside of the loom.
5. Make fringe loop on right side by bringing yarn to inside of loom, skip 9 pegs and wrap around 10th peg. Wrap around outside of loom, around all 10 pegs then bring yarn to inside of loom behind 3 pegs with stitches. NOTE: You can mark peg #14 with tape or a small elastic band. This peg is in between the loops. Wrap around peg #13 for right hand loops and peg #15 for left hand loops.
6. Wrap the 3 pegs and knit off.
7. Using tool, lift off fringe loops that are around the 10 pegs. Let loops drop to inside of the loom.
8. Continue with instructions #2 through #7 for five feet or for desired boa length. You will alternate making fringe on both sides of 3 pegs that have stitches.
9. Once you have the desired length of boa and all fringe loops have been dropped off, finish off by wrapping the 3 pegs and knit off. Bind pegs off using flat panel bind off. Use crochet hook to weave ends in. Gently tug on fringe loops to "lock'? in.
10. Worn around the neck, this boa is an eye catcher! It can also be tied around the waist and worn as a belt if you make it long enough. I used a yarn with loads of texture but any medium to bulky yarn will work. Just have fun with it!
What you will need.
Provo Craft Supplies
Other Supplies
  • "nubby type yarn" 1 skein divided into two balls will make a short version; use 2 skeins for longer boa (Boucle yarn works great)
  • Crochet hook to weave ends

Backpack

Instructions for backpackknifty knitter backpack pattern
Instructions
1. Using the yellow loom and using only one strand of yarn, wrap loom as picture shows. (Diagram #1)
2. Thread a yarn needle and starting as close to the center as possible, start to weave over and under, every 2 threads. (Diagram #2)
3. As you go around, you are weaving on an odd number of pegs (41 pegs). When you get back to the starting point, you will be going opposite over and under. (If you went over the first time you will be going under this row.)
4. Continue until you have as many rows as you can weave on the loom. It needs to be tight, but not too tight.
5. Leave the loops on the loom and wrap one more row on the loom. Knit the bottom loops over and continue knitting until your bag measures 17" or 55 rows of knitting. Crochet the loops from the loom loosely.
6. If you have to add yarn, be sure that you tie the new piece or pieces on inside the bag.
7. Measure 3 pieces of yarn 6' long and braid for the tie closer. Count down from the top of the bag 5 rows. Now weave the long braided piece in and out of the rows of knitting.
8. Using leather strips, braid them together and hook on to the bag as shown in diagram #3. Add your favorite possessions and you are on your way.

What you will need:
Provo Craft Supplies
Other Supplies

Monday, April 21, 2014

Matching Hat and Scarf


Knifty Knitter Matching Hat and Scarf
Instructions
1. Scarf: Using the blue round loom, start with a yellow strand and a blue strand and continue to knit 10 rows. Then switch to both strands being yellow for another 10 rows, doing the same with two blue strands for another 10 rows. Because the yarn is corrugated your colors will vary in shade. Finish with 19 sections of color (19 sections of 10 rows a piece). This leaves you with a very thick tube scarf. For something a little less stiff use only one strand of yarn. Add fringe to the ends to give it a little more character or sew the ends together to close off the opening!

2.
 Double-sided hat: The key to making a double-sided hat is to make sure that you have the same amount of rows on both sides so that the designs do not overlap or show on the wrong side. Using the green loom, start by doing one strand of each color on one side. This consisted of 40 rows. Then begin the other side of the hat with two strands of yellow, which consisted of 10 rows. Switching to two strands of blue and knit 8 rows. Then switch to yellow, making 7 rows, and again blue with 8 rows. Finish with yellow making 7 rows. To close the hat off, used a blue strand of blue yarn to leave a fun little ring on the top of the hat. Note that this is a very big hat. It will be necessary to decide how many rows you will need to make a hat your size. Something else to keep in mind is that the color you finish with on your loom will become the top of your hat and NOT the rim. If you end up making the hat too large just roll it and have a brim! Enjoy!!!

What you will need:
Provo Craft Supplies
Other Supplies
  • Lion Brand Homespun Yarn- Delft(yellow) and Inca(blue)- four skeins (two of each color)

Horizontal Striped Hat

Knifty Knitter Hat
Instructions
1. Note: you may want to use the Green Loom which is the size that more adults make their hats, but the sample shown is an ex-large.
2. Using one strand each of Ranch Red and Burgundy knit 20 rows and make a brim, by pulling the first row back up on the pegs and knitting them over.
3. Pattern for the rest of the project: Change to the Spring Green and using 2 strands of yarn knit 5 rows, change to the Delft Blue and using 2 strands of yarn knit 5 rows.
4. Change to the Ranch Red and Burgundy and knit 15 rows. Repeat these three colors until you have 5 sets of knitting.
5. Finishing: Crochet the loops from the loom and sew the top flat.
6. Cut 7" pieces of yarn and using 6 pieces make fringe. Do one bunch of blue then a bunch of green across the top of the hat.
7. This is a very warm hat and scarf for those cold winter days. This project takes a little longer than most, but it is worth the time spent.
What you will need:
Provo Craft Supplies
Other Supplies
  • Crochet hook J or K
  • Lion Brand Yarn Wool-Ease
  • One skein of Ranch Red, Burgundy,Spring Green, Delft Blue

Baby Booties


Knifty Knitter Baby Booties
Instructions
1. Using 12 pegs e wrap both strands around these pegs and turn and knit back and forth for 12 rows.
2. Take the beginning stitches and put them up and over the pegs as you would if you were making a brim on a hat, knit these stitches and continue knitting for another 12 rows.
3. Cut the yarn you are knitting with about 14" from the knitting. Using the yarn needle thread the end of the yarn back through the 12 loops on the pegs and pull tight for the toe.
4. Tie the yarn at the toe and then sew or weave up the top or front of the bootie.
5. Finish by chaining a piece of yarn about 12"long and thread through the fold on the top of the bootie. Make a pom-pom and tie on each end of the string. You could also use a piece of ribbon if you do not want to make the pom-poms.
What you will need.
Provo Craft Supplies
  • Knifty Knitter Flower loom (12 peg) and pick
  • Using one strand of each Lion Brand Jamie Classic (Peppermint Pink) and Lion Brand Babysoft (Baby Print).

Bunny Tote

Knifty Knitter Bunny Tote
 
What you will need:

Provo Craft Supplies:
Other Supplies:
  • 1 Skein Baby Clouds Yarn by Red Heart Yarn (color of your choice)
  • 1 Skein Fun Fur by Lion Brand Yarn (color of your choice)
  • 18" of 1/4" or 1/2" satin ribbon your choice of color
  • Glue gun and glue sticks
  • 2 white pompoms for cheeks (or use the Knifty Knitter pom-pom maker)
  • 1 small pink pom-pom for the nose
  • Pink blush or pastel chalk
  • 2 wiggle eyes 1" x 1" fun foam for teeth (optional)

Instructions:
Bunny Bag for the Blue Round Loom1. Purse Body: For this project, take the end of each of the two yarns and e wrap the blue round loom with them as if they were a single strand of yarn. Knit in a spiral until you have 8" of tube knitting on the loom. End with only one loop on each peg.
2.  Cut the yarn, leaving a 12 inch tail. Thread on a needle and pull through the loops on the pegs.
3.  Take the loops off the pegs. Pull the yarn tail tight. This will gather all the stitches to make the bottom of the bag. Do a couple of slip stitches in the bottom to tie off.
4. Ears: Wrap the yarn on 5 pegs and work back and forth, using these five pegs until you have knitted 7 inches.
5. Remove in the same method as the purse. Tie off. The top of the ears will be the tied-off end. -- Make 2 of these.
6. Handle: Use the same method, but only 3 pegs.
7. Work back and forth on these 3 pegs until you have 12 inches for short handle or 48 inches for long handle (remember that the handle may stretch, so you can make it a little shorter).
8. Sewing the parts together: Laying the purse flat, pin one side of the handle to the left inside top of the bag.
9. Pin the other side to the right inside top of bag.
10. Using only the Baby Cloud yarn, thread the needle and sew handle ends in place.
11. Place each ear next to the front of each handle; pin and sew in place.
12. Thread the ribbon on the needle and sew 1 inch from the top, starting in the center front and sewing completely around the bag.
13. This makes a draw-string effect to close the purse.
14. Pom-poms: Using the Knifty Knitter Pom-pom maker, you can choose the size you would like for the nose and the cheeks.
15. Glue the cheeks on using the glue gun and placing them close together. Glue the pink pom-pom in the middle of the cheek pom-poms.

Knifty Knitter Bunny Purse

Joan Toczek knitted this adorable bunny tote and photographed her beautiful granddaughter holding it. She embroidered the eyes and made the teeth of folded over ribbon. She used pom poms for the cheeks and nose. Joan says that in a larger size, these would make great bags to carry Easter eggs for an egg hunt.


Patterns You Might Like: