1. Using one
strand of each yarn, e wrap the first 3 pegs and skip the next peg, wrap
the next and skip the next peg. Continue until you have filled up the
complete hoop.
2. Knit until
you have about 50 inches of knitting or until you have used all of the mohair
yarn. When crocheting the loops off of the loom, leave about 3 yards
to crochet the loops off
3. Make the crocheting very very loose. Add 7 inch pieces of yarn for fringe. This project uses 3 strands in each fringe group.
4. The top of
the shawl is the end with the 3 beginning stitches. These stitches pull
the shawl together and make it hang on the shoulders.
5. Hook together with a cord or a brooch.
6. Wear for a special day or give as a great gift.
What you will need.
Provo Craft Supplies
Knifty Knitter extra large loom (yellow)
Hook
Other Supplies
Yarn needle
Crochet hook J or K size
1 skein Micro Spun by Lion Brand Yarn (Lilac)
2 skeins Moonlight Mohair by Lion Brand Yarn (color of your choice)
1. Using one
strand of yarn and starting with the Red yarn, e wrap all of the pegs on
the green loom. Turn and wrap back to the first peg, then turn and go
back one more time to make 3 rows of loops on the pegs.
2. Knit 1 loop
over the top 2 loops. Wrap 1 more row on the pegs (this makes 3 rows
again) and knit 1 over 2. (This is the stitch pattern for the complete
project.)
3. Knit 6
rows, then switch to White yarn and knit 6 more rows. Repeat 2 more
times, alternating between Red and White yarn, for a total of 6 long
stripes.
4. Start
wrapping the Navy yarn at the beginning peg (counter clockwise) and wrap
to peg #18, then turn on peg #18 and wrap back to peg #1.
5. On the
other end, add the Claret yarn and wrap to the #18 peg; go around #18
and wrap back to the #36 peg. Continue making the Navy field and
changing the Claret and Aren yarns for the stripes every 6 rows. End
with the Red row and a total of 13 stripes.
6. To take the knitting off of the loom, knit the loops off so that you end up with only one loop on each peg.
7. Using a crochet hook, take the first 2 loops off the pegs and pull the second loop through the first loop.
8. Take the
loop from the third peg and pull it through the second loop. Continue
until you have taken all of the loops from the loom.
9. To make the
stars, use a yarn needle and make an X stitch, then make another stitch
from the center of the X and up between the middle of the X stitch.
10. Napkin
rings are made with the green loom, using 2 strands of yarn. Wrap 3
pegs and knit back and forth for 15 rows. Stitch the 2 ends together.
Tie a small bow using the red yarn and glue to a 1'? wooden star. Glue
the star to the stitched together napkin ring.
1. The main part of the knitting will be done on every other peg. This will make it very airy
2.Wrap the first three pegs and knit 10" or 11", back and forth.
3. Wrap the first three pegs skip the next peg and wrap around the next peg, turning back to the first 3 pegs.
4. Knit these
loops and when you wrap again skip the end peg and wrap around the next
and turn, continue adding a stitch on the one side until you have 10
pegs filled. Knit these rows even for 15 rows
5. Decrease
one stitch on the right hand side, by turning on the last peg (make this
last turning stitch very loose) and knit the next two stitches.
6. Using the
crochet hook take the loop from the turning peg and pull the next loop
through the end one and put the remaining loop back on the same peg.
Keep this very loose
7. Knit even on the last three loops for about 10 or 11".
What you will need.
Provo Craft Supplies
Using the Knifty Knitter green long loom and hook
Other Supplies
One skein Water Wave Yarn by Lion Brand Yarn (only used a part of the skein)
1. Right Hand
Mitten: Using the blue loom and main color of yarn (burgundy) wrap 20
of the pegs and knit flat for 17 rows or the length you may want for the
wrist.
2. Increase one stitch on each end of the knitting until the loom is full. Continue knitting in the round for 4 rows.
3. (1) Knit 3
stitches going counter clock wise, with the main color (burgundy).
Change to the thumb color of yarn (brown). (2) Start on peg #1 and wrap
to the peg #9.(3)
4. (4) Knit over pegs 4,5,6,7, of the main color of yarn (burgundy). Continue knitting on these 9 pegs for 14 or 15 rows. (5)
5. You will
have the burgundy loops on the pegs 1,2,3, and 8,9. (6)(7) Just leave
them on the pegs to hold them. (8) Continue knitting on these 9 pegs
until your thumb is 3.5" long or about 12 rows. Leave a 14" piece of
yarn and thread through the end of the thumb loops with the color yarn
that you are using (brown). (9) (10)
6. (11) Pick
up the main color yarn (burgundy) and wrap the 4 empty pegs and continue
on around and knit 21 more rows. Use a 14" piece of yarn run through
the loops on the top of the mitten and pull up tight.
7. Sew up the
cuff and pull up the loops on the end of the thumb and sew down the
inside of the thumb and around the bottom of the thumb.
8. Left Hand Mitten: Do the same instructions as the right hand until you get to the part of adding the thumb.
9. You will have knit the 4 rows in the round with all of the pegs knitted on. Wrap and knit to peg #13.
10. Change to
the thumb color and wrap pegs 12 through 20. Knit over the burgundy
stitches on pegs #14,15,16,17. Continue with the thumb on the 9 pegs
numbers 12 thur20.
1. Body of
shrug: Using 2 strands of yarn, wrap around the peg on the outside of
the loom, leaving about 3 to 4 inches of tail hanging from the tack. This is
your starting point.
2. Wrap the
yarn counter clock wise around each peg, traveling in a clockwise
direction; reverse on the last peg and wrap back to the first peg. Hold
the loom so you are looking at the tack and the pegs are pointing
upward.
3. Now using the hook tool, pick up the bottom loop or wrap of yarn and take over the top loop.
4. Wrap and
knit until you have the length you would like for your shrug. To
determine the size of the shrug, measure from your elbow, across the
shoulders, and back to the elbow, for the main part of the shrug.
5. Removing: With a crochet hook, take the first loop from the peg and crochet, using the wrapping yarn through the loop.
6. Do a single
crochet (wrap the yarn over the hook and draw the yarn through the loop
on the hook) in between each of the loops on the pegs.
7. Cut the yarn attached and pull it all the way through the loop on the crochet hook. Pull it tight for a complete knot.
8. Cuff: Use
the small loom (blue). Wrap completely around the loom and knit a circle
for the cuff the length you would desire. Remove with a crochet hook
the same as for the body of the shrug. You will need 2 of these. (Make
sure they are the same size.)
9. Completion:
Turn your shrug wrong-side out and using your same yarn, crochet both
sides together to your desired length for the arms. Leave the ends open
for your cuffs.
10. Turn the
cuffs wrong side and crochet to the shrug. Seams may be pressed with
steam from an iron, but DO NOT LET IRON TOUCH the shrug. Hand wash
gentle.
1. This
project can be as crazy as you want to go. You could use multiple colors
or stay in the same color family. I'm always a little scared to try
really far out combinations, but when I do, I really get a lot of
comments.
2. Cut yarn in 3 yard pieces and arrange into the pattern of your choice. Each piece of yarn will make 2 rows of knitting.
3. First row:
Using 2 of the 36" pieces of yarn, measure 18" of yarn and wrap around
the peg on the outside of the loom. Wrap the last peg on the loom and
turn around and go back to the first peg. Knit this row. There should
be a 18" piece left on the end for the fringe.
4. Using the
yarn of choice measure 18" and wrap around the peg on the outside and
wrap the pegs. Knit and wrap back to the first peg. After the rows are
started you can unwrap the yarn from the peg on the side of the loom.
5. After you have knit several rows you can go to the starting end and tie the 4 ends in a square knot.
I used 2 strands of knitting worsted and one strand of knitting worsted and one strand of fun fur to knit together.
6. To take off
of the loom cut the yarn pieces longer, measure off the 18" fringe
piece and wrap and knit. When you have turned to go back, using the
yarn single crochet the looms from the loom. You will need to crochet
this side off very loose. Try to do both sides the same, tension.
7. The sample
is 45" long, (you can make it as long as you would like). When you
have done this shawl you will have the fringe finished too. Is that not
great.
8. I made a
square braid rope to hold the 2 corner together. Using 2 strands of
the one main color, wrap 2 of the pegs on the loom in a figure 8 design
knitting over the bottom loop when you have 2 loops on the pegs.
9. I knit this
15" long and tied on a tassel that is 6'? long. Thread the rope part
of the knitting through the front corner of the shawl and sew on the
corner of the back corner side of the shawl.
1. You will be using the
yellow round loom and 2 yarns - 1 Fun Fur and 1 Sparkle. If you
decide to make a different colored shrug, use a yarn that coordinates
with the fun fur.
2.E wrap the
full loom with the 2 yarns, turning on the last peg and coming back to
the first peg. Continue wrapping and knitting until you have 6 inches of
knitting.
3. Like doing
the brim on the hats, reach inside the loom and put the stitches from
the first row over the pegs to form the cuff. Knit off this row. You
will also have to stitch the sides together to make the cuff.
4. Change to
the coordinating yarn and cutting the fun fur off, continue knitting
until you have the desired length. Measure across your shoulders and
consider that you have 3'? cuffs on the ends.
5. When you
have knitted the desired length, add your fun fur back and discontinue
one of the coordinating threads. Using both of the yarns knit the cuff
for this end of the shrug. (This will be the brim for the second
sleeve). Take the knitting off of the loom using the crochet hook and
using single crochet Take the end of your sleeve and fold it and stitch
it closed with the yarn to match the first sleeve end.
Wash by hand.
What you will need.
Provo Craft Supplies
Ex-large Knifty Knitter loom (yellow) and hook
Yarn needle
Other Supplies
Crochet hook J or K size
2 skeins of Boucle by Bernet yarn
1 skein of white Fun Fur and 2 skeins, white frost, Sparkle, Wool-ease from Lion Brand yarn
Be ready for next Halloween by whipping up some of these
cute patterns on your Knifty Knitter looms. Pumpkins and spiders are
just a couple of the knitted Halloween items that you can make on your
looms. Try a pumpkin stocking cap, or a knitted trick-or-treat bag.
Photo credit Ivy Rocks
Jack-O-Lantern Pattern For the Knifty Knitter Looms
by Clelle Gustin
These
pumpkins can be made on any of the round looms. The size of the loom
determines the finished size of the jack-o-lantern. The smallest pumpkin
in the photo was done on the 5 inch blue round Knifty Knitter loom. The
red, green and yellow looms can also be used to make larger
jack-o-lanterns. This makes a cute fall craft, or paired with the spider pattern it’s perfect for Halloween.
Spider Pattern for the Yellow Round Knifty Knitter Loom
by Clelle Gustin
This
cute little knitted spider will help you decorate for Halloween this
year. He’s perfect paired with the knitted Halloween pumpkins above.
Although this pattern doesn’t specify the wrap, the e wrap or no wrap
stitch work well. It’s a quick and cute pattern that would be great for
Halloween.
Skill Level: Intermediate
You will need:
* Knifty Knitter Yellow Round Loom
* Yarn Needle
* Craft Glue
* Black Fun Fur Yarn
* Sparkle Yarn
* Red Heart Black Yarn
* Novelty Eyes
I
found this candy corn hat at the Connected2Christ blog. It’s a perfect
fall cap. This one was knitted on the green round Knifty Knitter loom. Skill Level: Beginner
You will need:
* Knifty Knitter Green Round Loom
* Yarn Needle
* Worsted Weight or Bulky Yarn in Orange, Yellow and White
* Hook
* Stitch Markers
1. Body: Knit
25 rows in the round as you would for a hat, using 2 strands of yarn
(leave a long tail on the winding peg to use in sewing up the bottom of
the spider body).
2. Take the
knit off the loom as you would a hat (take a 25 inch piece of yarn and
thread it through top and bottom to remove from loom). Put stuffing in
while still on the loom.
3. Legs: Make
8. Using the yellow loom, knit back and forth on 8 pegs for 47 rows
and leave a long piece of yarn on the winding peg to sew up the legs.
Take each leg off the loom as you would a hat. Fold legs horizontally
and sew up
4. Take each leg, fold in half, then whip stitch for a fold or bend in the leg. Turn spider over and sew four legs on each side.
5. Hot glue
two large wiggly eyes on top of spider near the front. (Use the size
eyes you like, spiders have small eyes, but larger eyes show up better)
6. Note from
Clella: This spider would be way cute if you used one strand of fun fur
to make it hairy. Sit Samuel in the pumpkin patch of knitted pumpkins
from our web-site here at Provo Craft. Have a Happy Halloween!
1 skein of Fun Fur by Lion Brand Yarn (color: Indigo)
1 skein of Wool-Ease by Lion Brand Yarn (color: Blue Heather or Denim
Step 1:
This hat is knit according to the basic hat instructions, which are
found in the packaging for the round looms. Begin by using one strand of
Wool-Ease yarn and one strand of Fun Fur. Hold the two strands together
and treat them like one strand. E wrap and knit 20 rows. Make the brim by pulling
up the first row and putting it back on the loom. Knit off. (Detailed
instructions and images for this step are included in the round loom
packaging.)
Step 2: Replace the Fun Fur strand with another strand of Wool-Ease and knit 10 rows.
Step 3: Replace one of the Wool-Ease strands with the Fun Fur strand, and knit for another 10 rows.
Step 4: Replace the Fun Fur strand with the other strand of Wool-Ease, and knit for another 10 rows.
Step 5: Replace
one of the Wool-Ease strands with the Fun Fur strand, and knit the last
10 rows. Sew the stitches off of the loom using the yarn needle and the
Wool-Ease yarn (see round loom instructions for details). Pull up tight
and tie the top (see round loom instructions for finishing a hat).
Step 6: The hat will flop over for a free and fun look. It will be about 14" long from the bottom of the brim to the top of the hat.
1. Use two
strands of yarn as one (one strand of Lemon and one strand of Spring
Green). E wrap (wrapping loops on pegs that look like series of lowercase
cursive es) two times around loom and knit off (pulling bottom loop over top
loop and off peg).
2. Knit 10
rows and carefully reach inside loom and place loops from first row back
over pegs. This makes brim or cuff for top of leg warmer. Knit this
row.
3. Continue knitting until leg warmer is total of 14" long (or desired length).
4. Using
crochet hook, take first two loops off loom and pull second loop through
first. Continue on around to take all loops off loom this way.
5. Knit second leg warmer using directions above. Add beads, button, bells, or whatever you would like to decorate.
1. Using
Flower Loom, e-wrap (wrapping loops on pegs that look like series of
lowercase es) 6 pegs and knit back and forth to make flap on pouch.
Make it about 3" to 4" long (or desired length).
2. Continue
around loom using all pegs and continue knitting rows, until bag
measures around 4". Note: Depending on the type of yarn you choose to
use, these 4" may be different number of rows.
To make the handle:
1. Using
Knifty Knitter Spool Loom, drop yarn down through middle of loom. Wrap 2
rows on small end of loom and knit off (pulling bottom loop over top
loop and peg).
2. Knit 28 rows (or desired length). Sew handles to side of pouch or attach to top of bag.
3. Add beads, buttons, sequins, or whatever you would like to embellish tote.
Original Neck Pillow Pattern by Clella Gustin, published by Provo Craft
Other Supplies:
One skein of yarn -
Jamie by Lion Brand Pale Green
Instructions
1. Use 2 pieces of yarn. You can use the same
skein and start the yarn from the center and take the outside end and
put them together.
2. Knit until your piece measures about 20 inches or about 58 rows.
3. Tie the end in the same manner as when you are finishing a hat.
4. Run a double strand of yarn through the loops on the pegs and pull tight and tie off.
5. Stuff the tube with a soft stuffing (make it firm).
6. When you have it stuffed use the blue yarn needle and run a double strand of yarn through the loops on the beginning end.
Here are some additional views of the neck pillow pattern. These were loomed by Barbie Martin.
The first is done with 2 strands of medium (4) weight yarn. Barbie notes that it still looked a bit thin, so she added one strand of fun fur and came up with the lovely pillow below:
Neck Pillow for the Blue Knifty Knitter Round Loom
The second neck pillow Barbie loom with Homespun Quick and Thick:
1. This
pattern takes a long time, but it can be done in steps and it does not
seem so long. Place your finished pieces in a plastic bag to store
between seasons.
2. This
project is knit in the cable stitch where you use a single strand of
knitting worsted yarn and e wrap three rows on the looms and then take the
bottom row up and over the other 2 rows (One-over-two stitch). Add one row and take the
bottom row over the 2 rows.
3. Start with
the green loom and wrap all of the pegs on the loom, knit 30 rows."
Pull up the loops from the loom as you would if you were making a hat
top."
4. Make sure
that you leave a hole in the middle to put over the dowel." Run a piece
of yarn through the beginning stitches and pull them up tight. (leave a
hole to put the dowel through).
5. I felt that this would be an easier way to show how to make the rings." There are 15 knitted disks.
6. Green loom:
Claret or red 30 rows.
Aren or white 30 rows.
Claret or red 27 rows
Aren or white 27 rows
7. Red loom:
Claret or red 30 rows
Aren or white 27 rows
Claret or red 24 rows
Aren or white 21 rows
8. Blue loom:
Claret or red 27 rows
Aren or white 24 rows
Claret or red 21 rows
Aren or white 18
Claret or red 15
Soft navy or Royal Blue 15 rows
Soft navy or Royal Blue 13 rows
Soft navy or Royal Blue" 11 rows
9. Using the
white or aren yarn in the middle of the knitted blue pieces do a cross
stitch and a stitch through the middle of the X.
10. Stack the circles in order and top with the wooden star.
What you will need.
Provo Craft Supplies
Green Loom,
Red Loom,
Blue Loom
Other Supplies
18 oz. of Claret or Red
18 oz. of Aran or White
18 oz. of Soft Navy or Royal Blue from a craft store:
1. Start at
top of hat: E-wrap around the entire hat loom twice. Knit off (taking
the bottom loop over top loop and peg). Repeat 2 more times.
TIP: The e-wrap is a basic wrap of the yarn around the pegs. It crosses
on the inside of the loom, and looks like a cursive lowercase e when
viewed from above.
2. Create
patterned row: Take the loop on peg 1 and place it on peg 2. Knit off on
peg 2 leaving peg 1 empty. Repeat with peg 3 and peg 4, taking the loop
on peg 3, placing it on peg 4, and knitting off on peg 4. Continue this
pattern around the loom, leaving every other peg empty.
3. E-wrap the
entire loom again, and then knit off on every other peg that has 2 loops
on it. The loom will then have one loop on each peg.
4. E-wrap and knit off 3 more rows. Then repeat steps 2 and 3.
5. Continue
knitting with desired pattern until hat is desired height. (We used 6
patterned rows total and ended with 3 knit rows.)
6. Create
brim: E-wrap twice around the loom and then knit off. Use the purl
stitch on the next row (see instructions for Purl Stitch on the Knifty
Knitter page). E-wrap and knit off the third row, and then purl stitch
on the fourth row. Repeat this pattern, alternating e-wrapping and purl
stitching for 4 more rows.
7. Crochet the
loops off of the loom using a loose chain stitch and keep it loose or
otherwise it will be too tight (see instructions for Chain Stitch on the
Knifty Knitter page).
1. Pumpkin Body --
Use 2 or 3 strands of yarn to knit your pumpkins.
2. Make them
all different sizes*, tall or short by the number of rows you want to
knit. Run a piece of yarn through all of the loops on the loom and pull
tight (this is the bottom). --*(the size of pumpkin and number of rows
will directly effect the time required to complete each pumpkin.)
3. Make sure that you have a long enough piece left to pull up to the top of the pumpkin.
4. Using the yarn needle thread with yarn and pick up the first loops of the piece and pull up, but do not tie.
5. Use craft stuffing and fill up the body of the pumpkin.
6. Do not over-fill the bodies. Tie the top off and pull up the yarn, running through the middle of the pumpkin.
7. Stem and
Leaf --
The leaf and stem can be made all together. Starting at the tip of the
leaf, wrap on one loop and then add one stitch on each of the next 6
rows.
8. Work even on these stitches for 4 rows. Start taking off stitches on the first of the next 4 rows.
9. Knit even on the 3 stitches for 4 rows. Add 3 stitches on the next 2 rows and knit even on these 10 stitches for 14 rows.
10. Cut the yarn that you are winding with about 20" and thread on yarn needle.
11. Run the yarn through the loops on the pegs and sew up the sides of the stem.
12. Stuff with a bit of stuffing and sew to the top of the pumpkin. Secure the leaf to the pumpkin.
13. Face --
Use a hot glue gun to add buttons for mouth, nose, and eyes.
What you will need.
Provo Craft Supplies
Any of the Knifty Knitter looms and hook
(The size will dictate the amount of time required to create the pumpkin)
Other Supplies
Pumpkin Body --
Use any orange yarn: samples use Lion Brand "Boucle'? and Red Heart
orange for the 2 large sizes and 3 strands of yarn of Red Heart orange
for the 2 small sizes. Be creative and use yarns of your choice.
Stem and Leaf --
Use any green. Sample uses Lion Brand "Boucle'? and Red Heart green together to make the stems and leaves.
1. Bottom Body Section:
With 2 strands of white yarn, work on every peg of green loom, for approximately 10-12 inches.
2. When you
have reached the desired length, cut your yarn about 15" away from the
last peg and put your yarn needle on the strands of thread. Go around
the loom picking up the yarn off each peg (starting with the first peg)
until you have all the yarn off the pegs.
3. Draw up the
yarn to leave an opening approximately 1-1"½" put the needle through
the opening and slide the opening over the handle of the plunger. Pull
the yarn snug. Whipstitch around in the loops surrounding the plunger
handle. (Tacky Glue can be used here also, for extra durability-put the
glue where the yarn and plunger handle meet on the inside of the
project).
4. Stuff the
bottom body section with polyfil to the desired fullness. Whipstitch
the top closed around the plunger handle. (Apply more glue here if
desired).
5. Middle Body Section:
Repeat directions for "Bottom Body Section'? this time using the red loom and working approximately 9-11 inches.
6. Top Body
Section
Repeat directions for "Bottom Body Section'? this time using the blue
loom and working approximately 11-13". When you whipstitch the top of
this section closed it will not be around the plunger handle. You will
draw it up tight and secure your stitches
7. This
section looks a little abnormally long, but remember "½ of this section
is covered by the hat, so you want it to be longer. You will sew
(and/or glue) the face on after the hat is on.
8. Hat:
Using the red loom, make a hat with brim and ball. To make the brim,
work every peg with 2 strands of yarn for approximately 12-14 rows; pull
the first stitch up on the pegs; knit off; continue working until your
hat measures about 7" or so.
9. When you
reach 7" , cut the yarn about 15" away from the last peg and put your
yarn needle on the threads and pick up the loops from around the pegs.
Pulling tightly, take your needle through to the center of the hat.
Whipstitch a couple of stitches to secure the hat. Make a pom-pom to
put on top of the hat using a pom-pom maker.
10. Scarf:
Using any loom work the panel stitch for 5 pegs with 2 strands of the
same yarn used for the hat. (When doing the panel stitch, the end pegs
only get knitted off every other row.)
The scarf is approx. 24-25" long (before fringe)
11. Bind off;
following directions in the Knifty Knitter Slim Jim. Add fringe to the
bottom of the scarf by cutting pieces of the yarn approximately 6" and
pull 2 strands (folded in half) through the bottom of the scarf every
"½'? or so, using a crochet hook. Pull the ends of the fringe through
the loop made by the crochet hook. Snug down and trim the fringe if
needed. ENJOY!!
What you will need.
Provo Craft Supplies
1 set of Knifty Knitter Looms (Round)
Other Supplies
1 NEW Sink Plunger (about 12" tall)
2 skeins of white yarn (3oz. or larger)
1 skein of any color yarn for hat and scarf (rolled into 2 balls)
Baby Squares with Cross Stitch Ribbon
Created By: Kathy Underwood
Time to Do: 3 - 5 hours
Level: Intermediate
Instructions
1. Use 2
strands of yarn as one for the complete project.
Using the Knifty Knitter Round Loom Red (and all 31 pegs), panel knit
four panels of knitting using the e-wrap. Knit first panel: blue yarn
for 48 rows, white yarn for 10 rows, pink yarn for 48 rows, white yarn
for 10 rows, green yarn for 48 rows, white yarn for 10 rows, and then
yellow yarn for 48 rows.
2. Knit second
panel: pink yarn for 48 rows, white yarn for 10 rows, green yarn for 48
rows, white yarn for 10 rows, yellow yarn for 48 rows, white yarn for
10 rows, and then blue yarn for 48 rows.
3. Knit third
panel: green yarn for 48 rows, white yarn for 10 rows, yellow yarn for
48 rows, white yarn for 10 rows, blue yarn for 48 rows, white yarn for
10 rows, and pink yarn for 48 rows.
4. Knit fourth
panel: yellow yarn for 48 rows, white yarn for 10 rows, blue yarn for
48 rows, white yarn for 10 rows, pink yarn for 48 rows, white yarn for
10 rows, and then green yarn for 48 rows.
5. Lay first
and second panels face-up on a flat surface. Connect with a mattress
stitch to hook them together. To use the mattress stitch, line up the
matching white sections from the two panels. Thread a long strand of
white yarn through your yarn needle. With the edges of the two panels
side by side, sew with the yarn needle through the loops on either edge.
Pull tight once you have sewn up the gap between the panels, knot, and
weave any ends into the panels.
6. Using the
yarn needle and the ribbon, sew over the seam. Sew in about every fifth
row of knitting. You will be sewing one strand of ribbon one way, and
then using a second strand of ribbon to sew the opposite direction (see
close-up picture). Tie a bow on each end of the rows
What you will need.
Provo Craft Supplies
Knifty Knitter Round Loom Red
Knifty Knitter yarn needle
Other Supplies
4 skeins yellow worsted weight yarn
4 skeins blue worsted weight yarn
4 skeins pink worsted weight yarn
3 skeins white worsted weight yarn
Ribbon: white 1/4" or 1/2" ribbon (the 100% polyester ribbon will wash very well)
I used:
4 skeins yellow worsted weight Jamie Classic by Lion Brand® Yarn
4 skeins blue worsted weight Jamie Classic by Lion Brand® Yarn
4 skeins pink worsted weight Jamie Classic by Lion Brand® Yarn
3 skeins white worsted weight Jamie Classic by Lion Brand® Yarn
Created By: Kathy Underwood
Time to Do: Couple Weeks
Level: Intermediate
This project measures 40.5" x 60" --
This project is done in panels and can be easily taken with you in your travels.
Instructions
1. You will be using 2 strands of yarn as one throughout the entire project.
2. Split
panels:
Use the Knifty Knitter Round Loom Blue and 2 strands of blue yarn to
e-wrap 9 pegs. Wrap these 9 pegs then knit back and forth for 36 rows.
Change to the red yarn and knit 54 more rows. Create 4 of these panels.
3. E-wrap the
loom with the blue yarn and knit 36 rows then change to the white yarn
and knit 54 more rows. Create 3 of these panels.
4. Long panels:
E-wrap 9 pegs on the loom with the white yarn and knit 90 rows. Create 3 of these panels.
5. E-wrap 9 pegs on the loom with the red yarn and knit 90 rows. Create 3 of these panels.
6. Use the
yarn needle and sew the stripes together to make blanket. Cut the 13
stars from felt and sew on with sewing thread and needle.
7. Note. When
this blanket was first knit the designer knit the blue background using
the Knifty Knitter Round Loom Yellow, all in one piece. Because the
pegs on this loom are wider apart it knits a different gage than the
blue loom, which the stripes were knit on. The pegs are closer together
on the smaller loom. It was very hard to make the blanket sew together
right, so we have changed the pattern and hope that you will enjoy
creating this fun blanket.
1. Note: you
may want to use the Green Loom which is the size that more adults make
their hats, but the sample shown is an ex-large.
2. Using one
strand each of Ranch Red and Burgundy, wrap and knit 20 rows and make a brim, by
pulling the first row back up on the pegs and knitting them over.
3. Pattern for
the rest of the project: Change to the Spring Green and using 2 strands
of yarn knit 5 rows, change to the Delft Blue and using 2 strands of
yarn knit 5 rows.
4. Change to the Ranch Red and Burgundy and knit 15 rows. Repeat these three colors until you have 5 sets of knitting.
5. Finishing: Crochet the loops from the loom and sew the top flat.
6. Cut 7" pieces of yarn and using 6 pieces make fringe. Do one bunch of blue then a bunch of green across the top of the hat.
7. This is a
very warm hat and scarf for those cold winter days. This project takes a
little longer than most, but it is worth the time spent.
What you will need.
Provo Craft Supplies
Knifty Knitter ex-large loom (yellow)
Yarn needle
Other Supplies
Crochet hook J or K
Lion Brand Yarn Wool-Ease
One skein of Ranch Red, Burgundy,Spring Green, Delft Blue
This scarf was originally published in the Provo Craft instructional pamphlets with the Knifty Knitter green round loom. The pattern can also be made with the Boye or Darice brand orange round loom that is exactly the same size and has 36 pegs too. If you have the Readaeer round loom set, use the pink loom.
If you want a larger scarf, try using the Boye or Darice purple round loom. This one is called the extra large round loom. You can also substitute the Readaeer green loom.
The scarf is made with eyelash or fun fur yarn that gives it a fuzzy fun finish that any girl will love. I like to make them as Christmas gifts for the young ladies in my family.
What you will need:
Round Loom
3 skeins of Fun Fur
Crochet hook size K
Instructions:
1. Knit scarf using one strand of eyelash yarn (Fun Fur works great).
2. Knit around loom until scarf reaches desired length. (Make sure you leave about 7 yards on skein to finish scarf.)
3. Pull loop off the first peg onto a size K
crochet hook. Chain two. Pull loop off 2nd peg. (You should now have two
loops on your crochet hook.)
4. Keeping stitches VERY loose, single crochet
(wrap yarn and pull through first loop, then wrap yarn and pull through
both loops). Chain one.
5. Pull a loop off the next peg. Single crochet and chain one.
6. Continue around (single crochet, chain one) until all pegs are cleared.
7. Connect to the beginning of row with a secure knot. Cut end, leaving one inch.
This versatile scarf is easy to make on the
Knifty Knitter and can be worn a variety of ways. Reach inside the scarf
and it will stretch to several times its original size. Now it can be
worn as a hood, cowl, or shawl.
Create ribbing by alternating knit (no wrap) and purl stitches and you knit in a circular motion continuously around the loom. Do this until the knit is approximately 3 inches.
Work approximately 70 rows of no wrap stitches.
Create 3 more inches of ribbing around the bottom of leg warmers.
Bind off by sewing through each loop to remove it from the loom. Using a crochet cast off will make the edge too tight.
The
long knifty knitter looms are typically used for knitting blankets,
shawls and scarves. While, the round looms are more frequently used to knit hats, socks,
slippers, and mittens.
Knifty Knitter looms are typically sold in
sets of four. The long looms are sold together as a set and the round
looms are sold together as a set. Each set comes with the Knifty Knitter
hook and a yarn needle. While the looms are
typically found in sets at department stores, they can be found for sale
individually online at Amazon or Ebay. Knifty knitter looms are quickly
becoming popular because they are easy for beginners or children to
learn to use.
Long Looms
The blue long loom
is 22 inches wide. Because this is the longest of all the looms, it is
usually used for knitting blankets and afghans.
The green long loom is 18 inches wide. This loom is commonly used for making pillows and children's shawls and sweaters.
The yellow long loom is 14 inches wide. The yellow long loom is typically used for making children's hats and crafts.
The pink long loom is typically used for making crafts and is 10 inches long.
The
Knifty Knitter long looms are typically used for knitting blankets,
shawls and scarves. To knit flat pieces of work such as a blanket or
scarf, one edge of the loom left open. It is possible to knit a hat or a
tube knit project on a long loom by knitting around the loom in a
circular pattern, but long looms are better suited for flat knits.The
size of your finished work determines how many pegs you should knit
off. Because you do not have to knit off all the pegs you can use the
longest loom to knit virtually anything, because you do not have to knit
off all the pegs. The smaller looms do not have enough pegs to make
large pieces of work.
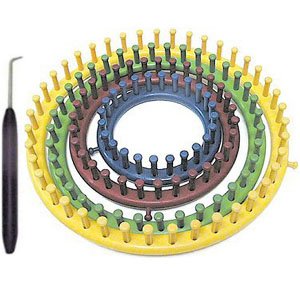
Round Looms
The yellow loom (11.5 inches wide) is for extra-large adult hats.
The green loom (9.5 inches wide) is for adult hats.
The red loom (7.5 inches wide) is for knitting children’s hats and scarves.
The blue loom (5.5 inches wide) is for baby’s hats, mittens, booties, socks, etc.
The
round looms also come in a set of 4 looms of various sizes and lend
themselves to knitting hats, socks, slippers, and mittens. The long
looms can be used for knitting flat pieces of work by leaving one side
of the knit open, rather than knitting circularly, but the loom shape
lends itself to tube knitting.
Flower Loom
The flower
loom is sold individually and is not included with any set. It is used
to create flowers. It includes a Knifty Knitter Hook, a yarn needle, and
instructions to knit flowers.
Free Patterns and Projects for the Knifty Knitter Spool Loom
The first thing you should know about a spool loom is that it has 2 ends and both may be used for knitting. There is a wide end and a narrow end. Spool looms are generally used for knitting long ropes or
cables. For example, the strap of a loom knitted purse is often made
with the spool loom. Here are a few patterns to get you started using
your Knifty Knitter spool loom, including some ideas you wouldn't
expect, such as a Valentine's Day card and a scarf!
Braided Tube Scarf Pattern
for the Knifty Knitter Spool Loom
This
scarf is made by knitting 5 long tubes on the spool loom and braiding
them together along with some fun fur. It adds depth and dimension to
the finished scarf. You can experiment by mixing and matching the
knitted tubes in different colors. I've seen one done in the primary
blue and yellow. It was adorable. This can be a very long project for a
beginner, because it takes a while to make all the tubes.
Skill Level: Beginner
You will need:
* Knifty Knitter Pom Pom and Tassel Maker
* Knifty Knitter Spool Loom
* Knifty Knitter hook
* Yarn Needle
* 3 or 4 skeins of worsted weight yarn
* fun fur
This is the Knifty Knitter spool loom by Provo Craft. If you haven't
seen one, you may not realize that they have 2 sides with pegs. One end
is slight smaller than the other, so you can make 2 different widths of
knit on the same loom. The smaller side can also be used to make the
thumb of a mitten or glove.
The cords around the edge of this precious Valentine's day card are
knitted on the Knifty Knitter spool loom. The Valentine is a creation of
Brenda at the "Loom Lore" blog.
Skill Level: Beginner You will need:
*spool loom
*several colors worsted weight yarn
*a Knifty Knitter hook
*card stock
*craft glue Lacy Valentine Scarflet from Loom Lore
The Knifty Knitter blue round loom makes knitting hats for
preemies and dolls easy and fast. Even if you have never knitted before,
you will be able to lear...
The first set of knitting looms that I bought in 2008 were the
Knifty Knitter brand by Provo Craft. After knitting for a while, I soon
learned that there ar...
The Knifty Knitter 10 inch long pink loom is popular for a
couple of reasons. It's the smallest of the long looms, so it travels
easily in a bag or purse. Y...
This is the very longest Knifty Knitter brand loom currently
made. I use it often for making blankets. It measures 22 inches long. I
use it to knit both sin...
The Knifty Knitter red round loom is for you if you want to knit
hats for young children. This loom makes knitting a hat for a baby, or
toddler, a breeze. Y...
You can knit quickly and easily with the Knifty Knitter
Rectangle loom. It is designed specifically for making scarves,
blankets, and other types of double...
The Knifty Knitter straw weaver made by Provo Craft is not so
much a knitting loom, as it is a weaving tool. If you've seen them, but
you aren't quite sure...
The long green Knifty Knitter loom made by Provo Craft is 18
inches long. You can buy it individually, or as part of the long loom
set. There are some free...


