Tuesday, February 18, 2014

Drop Stitch Shawl Pattern for the Round Yellow Loom


This elegant shawl is perfect for an evening out. Because it's made from very warm Superwash Merino wool, it will keep the chill off your shoulders and it's easy to maintain. This wool is washable.


The dropstitch is a knitting technique for creating open, see-through knit with a lacy appearance. In loom knitting, stitches are deliberately dropped in a repeated pattern to achieve this desired effect. This dropstitch shawl was created by alternating rows of drop and e wrap stitches.

Intermediate skills are required. If you've mastered all the beginning loom knitting stitches, such as the e wrap and purl, the drop stitch is a good next step. It will require approximately 10 hours to complete.

You Will Need:


To make this shawl, you will need the supplies below:
6 skeins of Knit Picks Swish Worsted Merino Wool Yarn (Black)
Extra Large Round Knifty Knitter Loom (Yellow)
Knifty Knitter Hook 


Instructions for the Dropstitch Shawl
  1. Holding 2 strands of yarn together as one, cast on by e wrapping 30 pegs.
  1. E wrap and knit back to peg 1.
  1. Purl peg 1 twice. Purl peg 2 twice.
  1. Double e wrap pegs 3 through 30. ("Double e wrap" means wrap each peg 2 times as you move clockwise around the loom. Each peg will have 3 loops when finished.)
  1. Knit back to peg 3 bringing the bottom loop over the top 2 loops.
  1. Drop stitch pegs 3 through 30 by lifting the top loop off each peg. This releases the double loop into one large open loop, or dropstitch. Push these open loops down on the pegs as you work to prevent them from coming off the loom.
  1. Repeat from step 2, eighty times or until the shawl reaches the length you desire.


The first two pegs of this shawls are knitted by alternating the e wrap and purl stitches. This creates an edge that will not roll.


Add the Fringe

To the Dropstitch Shawl


Fringe is added along the sides and bottom of the shawl.

  1. Holding 3 strands of yarn together as one, cut them into 10 inch pieces.
  2. Still holding 3 yarns together as one, fold them in half. Using a crochet hook, feed the hook under two loops from the side of the shawl. Hook the yarns you are holding together and have folded with the crochet hook and pull them gently through the loops. Pull them approximately one inch with the hook. This creates a loop.
  3. Feed the loose ends of the fringe through the loop created in the previous step. Tug the ends gently to tighten the knot and secure the fringe.
  4. Continue along the sides and bottom of the shawl until all three sides have the amount of fringe desired. (See the photos below.) 

Knifty Knitter Snowman Patterns


Snowman Patterns for the Knifty Knitter Looms

this lens' photo
There are so many adorable snowman patterns available for the Knifty Knitter loom online, I decided to collect them all here. All have photos, so you can see a sample of the finished project. These snowmen are perfect knitted Christmas crafts and gifts.


Photo Credit: Grant MacDonald


Snowman Sweater

Pattern for the Knifty Knitter Looms


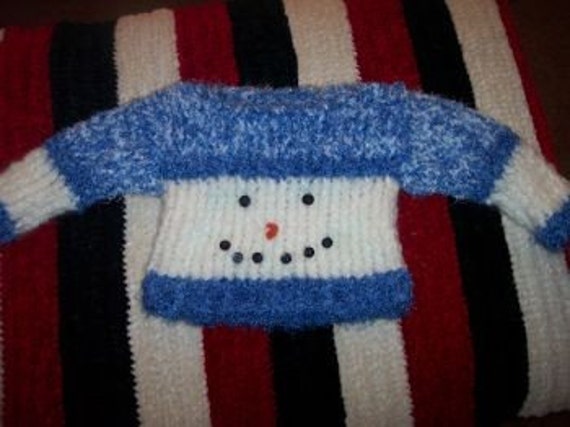
snowmans photosculptureThis super cute snowman sweater pattern is available at Etsy.com, but it's free. You'll need the green round loom.

Snowman Sweater


Stuffed Snowmen Pattern

for the Knifty Knitter Flower Loom


snowman knifty knitterThis pattern comes from the Loom Lore blog where she explains how to make these stuffed snowmen with the flower loom. If you have some extra time, she also has some adorable holiday angels on this blog that can be loom knitted also.

Stuffed Snowman Craft


Frosty the Snowman Hat Pattern

for the Knifty Knitter Looms


How cute is this? Make sure that the kids on your Christmas list are decked out in this Frosty hat this winter season.


Frosty the Snowman Hat Pattern


Stanford the Snowman Pattern

by Sweet Things Di Zia Sara's Blog


This pattern is being sold for $4.00. It features the e-wrap stitch.


Stanford Snowman Pattern


More Snowman Patterns

for Your Knifty Knitter Loom


Loomed Snowmen Trio
This stuffed trio of snowmen is from Bev's Country Cottage. The hat and body of the snowmen is knitted using the blue loom, or smallest loom in the round loom set. For the scarves, they recommend using the "wonder knitter" or crocheting them. Another option that I would suggest is following the instructions for an "I-cord" and simply making the cord slightly wider. It would make a perfect snowman scarf and you can use a loom that you already own. The stitch used to make these snowmen is the e-wrap, also called the twisted stockinette.
Loom Lore: Snowman Cozy


I'd use this cozy from the "Loom Lore" blog to cover candles, or gift jars, but it says it's for toilet paper. The possibilities are endless.

It uses the red Knifty Knitter loom, and the spool loom for the scarf. This snowman cover was also done in the "e-wrap," or twisted stockinette stitch. I love the burgundy color of the hat and scarf.

Free Knifty Knitter Mittens Pattern


Pattern for Knifty Knitter Mittens
Pattern for Knifty Knitter Mittens|HS Schulte
The Knifty Knitter blue round loom is used for all sizes of mittens. The blue loom is the smallest in the set of round looms. These mittens are incredibly warm, as they are knitted using two strands of yarn together to create a thick finished knit. The mittens are knitted using the one-over-two stitch, which is an easy stitch for beginners to loom knitting.

Knitting the Thumb for the Mittens

Wrap nine pegs of the loom using the e-wrap and two strands of yarn as one. Continue wrapping back and forth across these nine pegs until each peg has been wrapped three times. One of the most common mistakes a beginner makes when wrapping a loom is to wrap it too tightly. This makes it very difficult to knit off. When e-wrapping the loom, wrap very loosely.
  1. Knit-off by pulling the bottom loop on each peg up over the top of the next two loops on the peg. This method of knitting off is called a "one-over-two stitch," or "double stitch." Continue knitting off using the one-over-two stitch for 18 rows. This means that knitting off is done back and forth across the loom 18 times. At the end of each row, knit-off the end peg only once.
  2. Cut the tail of the yarn one foot long. Thread the tail through a yarn needle and use this needle to stitch up through each of the remaining two loops on each peg. Once all the loops have been removed from the Knifty Knitter loom, pull the yarn tight to gather up the sewn through edge. Tie the yarn to hold the gather, but do not cut it.
  3. Turn the knit so that the wrong side is facing out and stitch the thumb together using the yarn to sew down the length of the thumb.

Knitting the Body of the Mittens

  1. E-wrap 22 pegs of the blue Knifty Knitter loom using two stands of yarn as one. Continue wrapping back and forth across these 22 pegs until each peg has been wrapped twice. Begin to wrap the loom a third time, but this time alternate the direction of the e-wrap on every other peg. The top of the "e" should face the outside of the loom on the first peg wrapped and the inside of the loom on the second peg wrapped.
  2. After all the pegs are wrapped three times, knit off using the one-over-two stitch. Continue this pattern of wrapping and knitting off until four rows have been knitted.
  3. Return to e-wrapping all the pegs with the top of the "e" facing out, as was done with the thumb of the mittens. Use the one-over-two stitch and continue wrapping and knitting off rows until 55 rows have been knitted.

Finishing the Knifty Knitter Mittens

  1. Cut the tail of the yarn 2 feet long. Thread the yarn through a yarn needle. Sew up through each loop on the pegs. After sewing through a loop, remove it from the peg.
  2. Pull the tail tight and tie a knot in the tail with the top of the mitten gathered. With the mitten turned wrong side out, sew along the side of the mitten to stitch it closed. Just before reaching the half way point, place the thumb along the seam being stitched. The right side of the thumb will be inside the glove. Stitch along the sides of the thumb to attach it to the body of the mitten, then complete the seam to complete the side of the mitten. Some trial and error is often necessary to position the thumb in exactly the correct location along the seam.
Repeat the steps above for the second mitten. The right and left mitten are identical. The pattern above will make mittens large enough for an adult. To alter the pattern for a young adult, reduce the number of pegs wrapped in each row by 2 pegs. Reduce the number of rows knitted by 5 rows. To knit a pair of mittens for a young child, reduce the number of pegs wrapped by 4 pegs. Reduce the number of rows knitted by 10 rows.

    Patterns You Might Like: