Sunday, December 15, 2013
Basket Weave Stitch Pattern on the Knifty Knitter
The basket weave stitch pattern, also called a block stitch pattern, can be done on knitting looms. Following a pattern of k3, p3 for 4 rows, followed by 4 rows of p3, k3 can achieve this look. Here is a photo of the finished knit. and more instructions on how to make this unique pattern on any Knifty Knitter loom.
The Drop Stitch Shawl for the Knifty Knitter
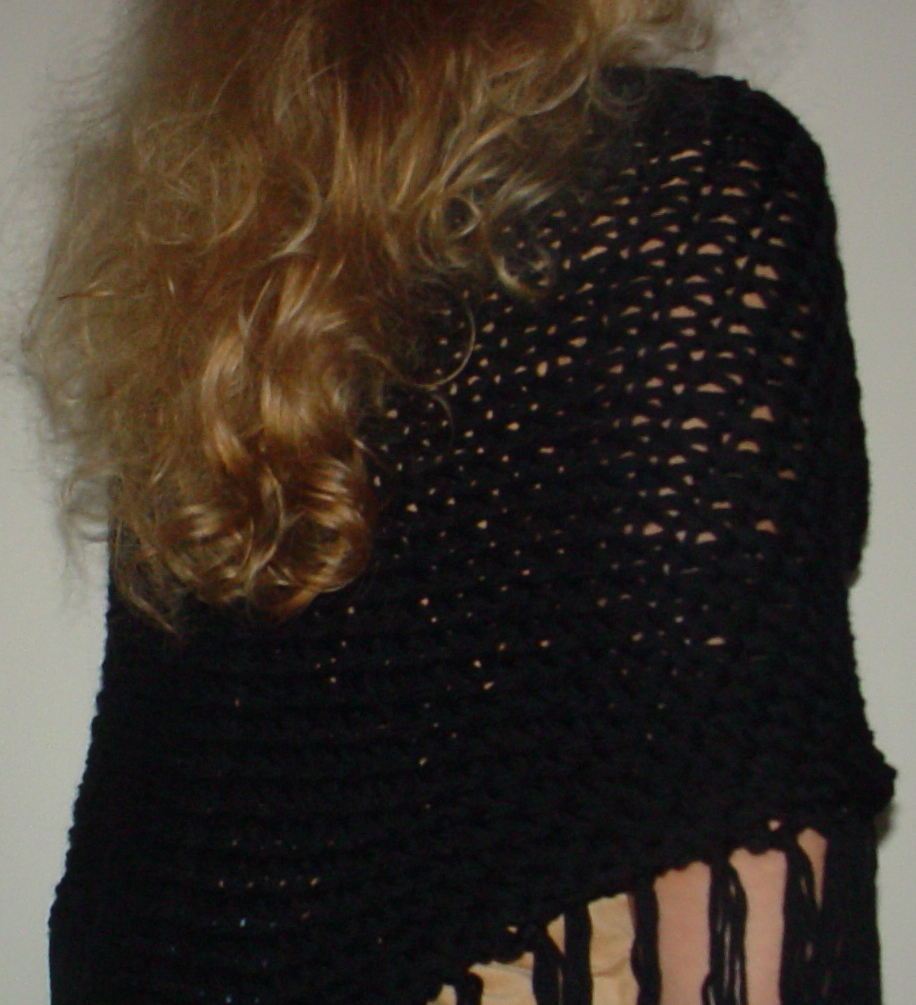
The drop-stitch is a knitting technique for creating open,
see-through knit with a lacy appearance. In loom knitting, stitches are
deliberately dropped in a repeated pattern to achieve this desired effect. This
drop-stitch shawl was created by alternating rows of drop stitches and e wrap
stitches (twisted stockinette).
Skill Level: Intermediate
You will need:
- Large Round Knifty Knitter Loom (Yellow)
- 9 Skeins Worsted Weight Merino Wool Yarn in Black
- Knifty Knitter Hook
- Crochet Hook

This shawl is made using 3 strands of yarn held as one while wrapping the loom. In addition to the drop stitch, this shawl uses the increase and decrease stitches on the loom.
1: Cast On using the E wrap on pegs 1 - 3.
2: E wrap back to peg 1 and knit off.
3: Purl pegs 1- 3
4: E wrap back to peg 1 and knit off.
5: Purl pegs 1 & 2.
6. E wrap and knit off on peg 3. Increase stitch on peg 4 by e wrapping it twice and knitting off the bottom loop over the top.
 7: Double e wrap (wrap twice) pegs back to and including peg 3. Knit off double wrapped pegs by bringing the bottom loop over both of the top 2 loops.
8: E wrap and knit peg 2 twice.
9: E wrap and knit peg 1 twice.
10: Repeat steps 6 through 9 until you reach peg 41. (In step 6, ewrap and knit off on all pegs that have previously been knitted. Increase stitch on the next peg empty peg of the row, increasing by 1 peg in each row.)
 11. E wrap and knit all pegs back to peg 1.
12. Purl pegs 1 and 2.
13. E wrap and knit to peg 41.
14. Double wrap and knit all pegs back to and including peg 3, by bringing the bottom loop over the top 2 loops.
15. Purl pegs 1 and 2.
How to Knit a Pot Holder / Hot Pad on a Knifty Knitter Loom

What you'll need:
- Pink long Knifty Knitter loom
- 1 skein multi-color medium weight yarn
- yarn needle
- Knifty Knitter hook
- Crochet hook
- E wrap around the loom once.
- Working in a continuous spiral around the loom, knit 40 rows using the no wrap stitch.
- Reach down through the middle of the loom and pull up the bottom. Using a yarn needle and spare yarn, sew the bottom together. Push the bottom back into the loom.
- Cast off using the crochet cast off by following the path of the yarn.
- Using a crochet hook, crochet the top of the pot holder together using a slip stitch, or single crochet stitch.
- When you are finished, chain a small loop for hanging the pot holder.
The Great Big Monster Blanket that Took Me Months to Loom - DONE!
This blanket was a gift for one of my boys that is a KU fan. I knitted each of the super long panels in the photo above using the fashion stitch on the blue long loom. This is how I did it:
- Cast on to the blue long loom with the 8 wrap holding 2 medium weight strands of yarn as one. Below is a photo of the eight wrap. It is not the blue loom you are currently using, but it is an example of how to do the cast on.

- Knit 400 rows per panel using the fashion stitch. Below is my video of the fashion stitch.
- Crochet cast off leaving a long tail of working yarn to sew the panels together. Tie the working yarns in a square knot to secure them where the knit ends, but leave them about 10 feet long. Below is my video of the cast off:
- Thread the working yarn through a yarn needle and mattress stitch the panels together. Below is my video of the mattress stitch, it is for a different blanket, but the method is the same. Look for the 2 small bars inside each stitch and sew through them:
- Use your favorite ribbon to decorate the blanket.


One-Over-One Stitch on a Loom
One of the first stitches made by new loom knitters is the one-over-one. You simply wrap the loom twice, then use the loom hook to pull the bottom loop over the top loop and off the peg. Wrap the loom again and repeat, always pulling ONE bottom loop over ONE top loop on the peg. Hence the name, "one-over-one." This stitch is also called the ewrap and twisted stockinette stitch.
Subscribe to:
Posts (Atom)
Patterns You Might Like:
-
 This pattern is for a dish cloth made using the smallest round loom in the set. It's a quick and easy project, perfect for the begin...
 -
 This elegant shawl is perfect for an evening out. Because it's made from very warm Superwash Merino wool, it will keep the chill of...
 -
 This pattern is for golf club covers, a unique gift for your favorite golfer. You'll be using the e-wrap and any worsted weight yarn. ...