
Saturday, January 14, 2012
Valentine's Day Pattern for the Knifty Knitters
This week, I've been working on collecting Valentine's Day patterns
for the looms. I came up with a heart, a Valentine's Day card, a scarf
with hearts, a scarf with roses, and a cowl with flowers. It hasn't
always been easy to find free patterns for the Knifty Knitter looms
online and I hope by continuing to collect and group them more loom
knitters will be able to find and use them. Anyway here is the Valentine's Day Pattern collection.
Saturday, January 7, 2012
Loom Knitting Stitches - Flat vs. Twisted Stockinette
For example, the twisted stockinette stitch is called the "e wrap" stitch, because you form a cursive letter "e" around each peg as you wrap the loom. So, "e wrap" = twisted stockinette stitch.
The other type of stockinette stitch is the flat stockinette. I refer to the flat stockinette stitch as the "no wrap" stitch, because you don't have to wrap the loom at all as you make it. There is a method of making the flat stockinette stitch called the "u wrap" method. It is the same as the "no wrap" stitch, but the working yarn is moved as if it's making a "u turn" around the working peg while knitting. This is supposed to prevent the knit from becoming too tight as you work. Instead of using the "u wrap," I just give each of my stitches a little tug with my hook after I've knitted them to prevent them from becoming too tight on the loom. So, "no wrap" = flat stockinette stitch. Also, "u wrap" = flat stockinette stitch too.

There it is! Everything you ever wanted to know about making the stockinette (knit) stitch on a loom... and more!
Thursday, January 5, 2012
The Knifty Knitter Looms vs the Boye Looms
A few years ago, Wal-mart carried the Knifty Knitter looms manufactured by Provo Craft. Recently, Wal-mart began carrying looms that said "Knifty Knitter" on the front, but they were manufactured by Boye. Later, the boxes of Boye looms dropped the brand name "Knifty Knitter."
See for yourself:
The original Provo Craft Knifty Knitter round looms:
The Boye Knifty Knitter round looms:
See for yourself:
The original Provo Craft Knifty Knitter round looms:
The Boye Knifty Knitter round looms:
For a short time the Boye box said, "Knifty Knitter," but it no longer does. I bought a set of the Boye round looms now sold at my local Wal-Mart, so that I could compare them to my Provo Craft looms that I bought a few years ago at the same Wal-Mart. Each round loom set comes with 4 looms. The size of the looms in each set is almost identical within 1/8 of an inch.
Because the looms are almost identical in size, and the pegs of only the medium and XL looms vary by 1 peg, they can be used interchangeably in patterns. Check it out:
Because the looms are almost identical in size, and the pegs of only the medium and XL looms vary by 1 peg, they can be used interchangeably in patterns. Check it out:
| Provo Craft | Boye | |||||
| Small | Blue – 24 pegs | Green – 24 pegs | ||||
| Medium | Red – 31 pegs | Blue – 30 pegs | ||||
| Large | Green – 36 pegs | Orange – 36 pegs | ||||
| Extra Large | Yellow – 41 pegs | Pink – 40 pegs |
Wednesday, January 4, 2012
The Ribbing Stitch for the Knifty Knitter Loom
Formally known as the ribbing stitch, it is also known as rib, or ribbed stitch. It is the stitch often seen on the cuff of sweater sleeves, or at the top of a sock. The ribbing stitch makes the knit stretchier and can be placed anywhere on a garment that you want a slightly snugger fit.
The ribbing stitch can be made on any Knifty Knitter loom (round or long) simply by alternating the knit and purl stitches. It's simple enough for the beginner to loom knitting. If you want to make terrific patterns on the Knifty Knitter looms, you'll want to learn this stitch.
You can create a variation of the ribbing stitch by knitting twice and purling twice, or knitting once and purling twice, etc. The idea is simply to alternate the two stitches in a continuous pattern around the loom making a snugger fitting knit.
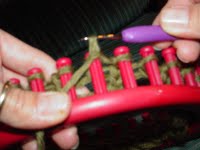
Don't know how to knit or purl? It's easy! The basic knit stitch is to ewrap the loom, place the working yarn above the loop on each peg and knit. Do this by bringing the loop up and over the working yarn and release it toward the inside of the loom, like this:

Purling is done by 1. Pushing the loops to the top of each peg on the loom. 2. Running the working yarn under the loop on each peg. 3. Sliding the Knifty Knitter hook under the loop (working from the top of the peg, down under the loop) snagging the yarn with the hook and drawing it back up through the loop on the peg. Like this:


The ribbing stitch can be made on any Knifty Knitter loom (round or long) simply by alternating the knit and purl stitches. It's simple enough for the beginner to loom knitting. If you want to make terrific patterns on the Knifty Knitter looms, you'll want to learn this stitch.
 | |
| Ribbing Stitch for the Knifty Knitter Looms |
You can create a variation of the ribbing stitch by knitting twice and purling twice, or knitting once and purling twice, etc. The idea is simply to alternate the two stitches in a continuous pattern around the loom making a snugger fitting knit.
Don't know how to knit or purl? It's easy! The basic knit stitch is to ewrap the loom, place the working yarn above the loop on each peg and knit. Do this by bringing the loop up and over the working yarn and release it toward the inside of the loom, like this:

Purling is done by 1. Pushing the loops to the top of each peg on the loom. 2. Running the working yarn under the loop on each peg. 3. Sliding the Knifty Knitter hook under the loop (working from the top of the peg, down under the loop) snagging the yarn with the hook and drawing it back up through the loop on the peg. Like this:
The last step of the purl is to grasp the loop created above between the finger and the thumb. Use it to lift the existing loop up and off the peg. Replace the previous loop on the peg with the new loop in your grasp.
Subscribe to:
Posts (Atom)
Patterns You Might Like:
-
 This is an modified version of the "Flat-Topped Hat" from the Provo Craft booklet " Knifty Knitter Adult Hat Loom Patterns...
 -
 This pattern is for a dish cloth made using the smallest round loom in the set. It's a quick and easy project, perfect for the begin...
 -
 This elegant shawl is perfect for an evening out. Because it's made from very warm Superwash Merino wool, it will keep the chill of...