Showing posts with label knifty knitter. Show all posts

Thursday, February 28, 2013

iPad App for Counting Knitting Rows

"Knit" app for Counting Knifty Knitter Rows

I recently downloaded this iPad app called "Knit." It's technically for the iPhone, but it works on iPad too and best of all it's free. After you download the free app, you get a screen like the one below upon opening.
knitt app

Obviously, you can select "start" or "how to use." The "how to use" button takes you to a Safari page with a video of the app. If you select "start," it takes you to the screen below.
ipad app knitting
Setting up the Project


If you select the plus button in the upper right hand corner, it allows you to add your first project. You can have several projects going. Each of them have the option to title it as you wish and select a picture. They have several pictures to choose from in the app, like the ball of yarn I used for blanket. There's also a picture for socks, a sweater, etc. You have the option to take your own picture of your project.

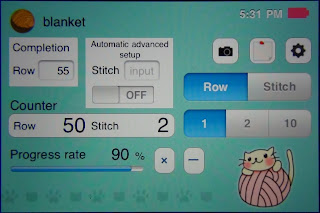
I set up my first project blanket. To get to the main screen that counts your rows, you simply tap on the title.

row counter ipad app

You can use the app to count stitches, but I wanted it primarily to count rows. To set it up, you tap the "completion row" box in the upper left corner. Type in the total number of rows you'll be knitting in your project. Then go over to the right just below the camera icon and choose "row." Choose the "1" under it.

Start knitting! Each time you finish a row, you tap the cute kitten in the lower right corner. It turns red and advances the progress bar. If you make a mistake and advance too many times, you can use the minus button to remove a row from the progress bar.


When you've knitted your last row, and tapped the kitten for the last time, the completion box pops up. Hooray! Time to celebrate.

Visit the "Knit" app page in iTunes
Saturday, February 23, 2013

Knifty Knitter Loom Shopping, Books and Accessories

Knifty Knitter Looms
I've been selling the Knifty Knitter looms for a little over a year and it occurred to me that loom lovers may want to know what is available, so I set up a page at Squidoo "Knifty Knitter Books, Loom, and Accessories". It explains which looms are sold as part of a set and which looms are sold individually, such as the specialty looms. It also lists all the accessories distributed by Provo Craft to make loom knitting easier.

My favorite part of the page (and the part where I devoted the most time) is the description of the Knifty Knitter pattern booklets. Many people haven't seen these and don't know what's in them. They are about 15 pages each, packed with how-to instructions that are perfect for beginners. Hopefully, the generous description of each will help you decide which to buy if you're ever booklet shopping. There are also some of my favorite loom knitting books listed. These pattern books aren't distributed by Provo Craft, but there are some fine authors that have written books just for the PC Knifty Knitter looms.

I mentioned the looms sets earlier. Some looms are currently available in sets of four, such as the round and long loom sets, or individually. For example you can buy the yellow XL round loom as part of the round loom set, or by itself. Provo Craft has stopped carrying them in individual packaging, so in the future you will have to buy the set of four round looms to get the XL yellow round loom. Some retailers, including myself, still have individual looms in stock, but when they are gone, they're gone! If you want to replace a single loom from your set, this is the time to do it.

Friday, February 8, 2013

Basic Knifty Knitter Hat on the Round Green Loom

This is a basic hat done on the round (large) green loom. It is the perfect size for my 12-year-old son. It also happens to fit me well. I am a small adult. If I were making this hat for a larger adult, I would move up to the XL yellow round loom to make the hat.

The hat is knitted brim to top. In other words, knitting begins at the bottom of the hat and ends at the top. The drawstring cast off, A.K.A. bind off, is used to close the top of the hat.

Supplies for the basic hat with brim knitted on the Knifty Knitter green round loom.
The hat in this tutorial was knitted using two strands of Red Heart Super Saver yarn as if they were one strand of yarn. The yarn color used is "fleck," which is a dark green with flecks of various colors mixed into the yarn. The pattern is from the book, "Knitting with the Knifty Knitter Booklet II," published by Provo Craft.

Instructions:
Step 1: Cast on and knit 16 rows.
Step 2: Make a brim by reaching through the center of the loom and pulling the first row up. Place each loop from row 1 onto the loom. There should be two loops on each peg of the Knifty Knitter loom now. Knit off.
Step 3: Knit 18 more rows.
Step 4: Cut the working yarn approximately 2 feet from the loom.
Step 5: Cast off by sewing through each loop and lifting it off the peg. Work in the same direction you were knitting. Prepare the working yarn to sew through the loops by threading it through a yarn needle.
Step 6: When all loops have been removed from the loom, pull the working yarn tightly to cinch closed the top of the hat.
Step 7: Tie a square knot. Leave a 5 inch tail and sew the tail into the inside of the hat.
My 12-year-old son wearing the finished hat.
Basic hat with brim knitted on the green Knifty Knitter round loom.


Video instructions for the basic brimmed hat on the round green loom!

Monday, January 31, 2011

Multicolored Figure 8 Stitch Scarf on the 9.5 inch Knifty Knitter Loom


My latest Knifty Knitter project was this multicolored scarf done on the 9.5 inch long loom. I used the figure 8 stitch with one strand of Red Heart Super Saver yarn. I published the full instructions for the scarf patterns here:


Free Figure Eight Stitch Scarf Pattern

The colors remind me of jelly beans. It looks good with a denim jacket.

How to Knit a Scarf on the Knifty Knitter Round Loom


I get a lot of questions as to whether it is possible to knit a scarf on a round loom. It is indeed possible. What you will end up with is a tube of knit that lays flat into two layers. You sew the ends together with a whip stitch. Long looms lend themselves to knitting scarves because there are more stitches you can do on them, however, it is possible to knit a scarf on a round loom too. It can be done with the e-wrap stitch or the no wrap stitch.

Another option is to knit the scarf around the loom using 12 pegs and then stopping and reversing direction, knitting back and forth on the loom rather than all the way around it. This will create a flat, single layer scarf. Doing it this way, the knit will be prone to rolling at the sides and you will have to block it.

Tuesday, January 25, 2011

Scarf Patterns on the Provo Craft Website


I was browsing scarf patterns on the Provo craft website today. I found many that I wanted to try (like this one), but for the most part, their instructions are extremely vague. The one that I wanted to make explained the stitch to be knitted like this: "Start wrapping the yarn around loom pegs in a figure-eight pattern as shown in the instructions that come with the loom." My loom set came with no instructions!  However, I believe the stitch they are referring to looks like this when wrapping the loom. I surfed around and found it on the Provo Craft site as well:


When you circle back to wrap the loom the second time, just go around the last peg once, like this:


To make the figure 8 stitch wrap across the width of the loom making a figure 8 as you go. When you get to the end, simply trace the yarn pattern back exactly as you made it the first time. You know have two loops on the loom, knit off bringing the bottom loop over the top loop with the Knifty Knitter hook. You now have one loop on each peg of the loom. Wrap the loom once using the figure 8 stitch pattern. Knit off again. Continue wrapping once and knitting off until your scarf is the desired length.


When finished, it looks a lot like the one over one stitch, except it is looser and it ends up being a flat panel rather than a circular tube knit. 


The figure 8 is in the photo below. I used wrapped and knitted off 15 or so rows, so that you could see what it looks like with one strand of Red Heart Super Saver acrylic yarn.


That would make a perfect light weight scarf for spring. If I were going to make a winter scarf with the figure 8 stitch, I would use 2 strands of yarn as one to make the finished knit more dense. If I were going to use a natural fiber, like cotton that doesn't have the loftiness, I would use 3 strands of yarn at once.


The figure 8 stitch (or any stitch knitted across the width of the loom such as the ribbed or honeycomb) actually does work well for scarves because it looks the same on both sides and does NOT roll like a knit stitch does. The problem with knit stitches (ewrap or no wrap) is that they roll on the edges when knitting a flat panel.


Monday, February 1, 2010

The knit and purl on the knifty knitter loom

When I began knitting on a knifty knitter, I had no instructions, so I sat down and made up what I called the "No wrap stitch." It is basically the purl stitch, as done on the Knifty Knitter loom. But, I didn't know that at the time. There are really two methods to making the purl stitch on the Knifty Knitter. One involves pulling the yarn up through the existing loop on the loom. You can see that method here: "How to Purl Stitch on the Knifty Knitter Loom." The second method involves lifting the loop over the loose yarn, so it doesn't need to be pulled through the existing loop. See "How to Make No Wrap Stitches," for instructions on using this method to purl stitch on the Knifty Knitter loom.

Monday, January 25, 2010

Tube or Panel Knit


When knitting from a Knifty Knitter loom, you can create tube knit or panel knit. Both are possible with any loom. To create a panel, which is like a sheet of fabric or a blanket, you knit back and forth on the loom with a starting and stopping point. To tube knit, like a sock or a booty, you make continuous rounds until your knit reaches the desired length. For more detailed instructions including how to do each and what types of project to make with each type of knit, see: Tube or Panel Knitting on the Knifty Knitter. The scarf in the photo is tube knitted.

Monday, January 4, 2010

Knifty Knitter Basics

The basics of how to use a knifty knitter loom are not well spelled out when a kit is purchased. There are no instructions included with the loom on how to wrap the loom, how to knit off the loom, or how to remove the project from the loom once it is finished.

When I was new to the knifty knitter this confused me honestly. The secret is that you can use instructions for any loom knitting on the knifty knitter. For those of you that are completely new to loom knitting, I have prepared several articles explaining "How to Use a Knifty Knitter Loom," "How to Wrap the Loom," and "How to Knit Off the Loom." I hope you find these helpful.

If you prefer, Googling the words "knitting" and "loom" with any other words you have questions about will give you basic instructions for loom knitting that can be used with the knifty knitter.

Tuesday, November 3, 2009

Knifty Knitter 101


Knifty Knitter knitting looms are great for knitters that have trouble with traditional knitting needles. They are also great for kids that want to learn to knit. Every loom knitting project begins by Tying a Slip Knot. Next, you will wrap the loom. After wrapping the knifty knitter loom, you knit off. The knit is produced by knitting off the loom in a circular rotation, around and around the loom until the knit reaches the desired length.

Monday, November 2, 2009

Make a Scarf on the Knifty Knitter Loom


I made a scarf on the pink knifty knitter loom. The finished width is 5-6 inches. I tube knitted it meaning that it is essentially a tube rather than a flat piece of cloth. The extra thickness of having two sides makes it very warm.

I made this scarf using a knitting off technique that I created myself. I call it the no-wrap stitch. It is the easiest way to knit off a knifty knitter loom, because the stitch does not become tight around the loom as with some other stitches.

Patterns You Might Like: